Disclaimer: This post may contain affiliate links, meaning we get a small commission if you make a purchase through our links, at no cost to you. For more information, please visit our Disclaimer Page.
Are you getting high CPU or Disk Usage issues with the Windows Modules Installer Worker on your Windows 10 computer?
Are you wondering what it is and why it occupies more than 50% (sometimes up to 100%) of CPU resources?
Those are common questions that are frequently asked by many Windows users. In fact, high CPU, RAM, and Disk Usage issues often occur in Windows, particularly Windows 8.1 and Windows 10.
One of the most common system processes that often take up computer resources is the Windows Modules Installer Worker. It’s also known by another name: TiWorker.exe – WMI Worker.
Sometimes, when you check the Windows Task Manager, you might have noticed that this system process occupies more than 50% of CPU resources. Or in some other cases, it causes the 100% Disk Usage error on your Windows 10 computer.
As a result, all the computer resources have been occupied, which makes your computer and its apps run slowly or even freeze. You might have tried to reboot your computer, but this didn’t help resolve the issue.
Read Article: Can’t Find Nvidia Control Panel? Here’s Where to Find It
What should you do to get rid of this irritating problem?
Table of Contents
Fix Windows Modules Installer Worker High CPU In Windows 10
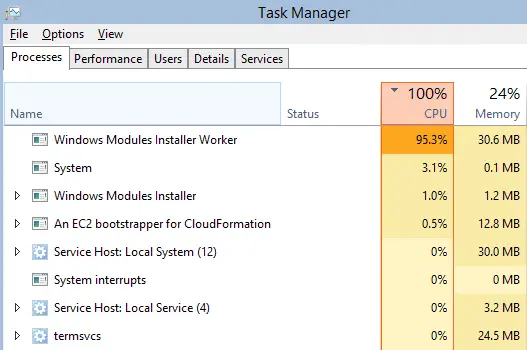
Image credit: Windows Modules Installer Worker system process in Windows Task Manager – by Peter Pan
Typically, this system process will run when your computer checks for new updates, as well as downloads and installs those updates into your Windows PC. It often works very smoothly and doesn’t occupy your computer resources.
However, if the WMI Worker process corrupts or something goes wrong, it will cause high CPU usage issues, or in some cases, it creates 100% disk usage. You might have tried to reboot your computer several times and hoped that this annoying problem would disappear, but it can’t be fixed by itself.
Fortunately, I have a few handy solutions that may help you to get rid of this problem. These methods are shared by users from Microsoft Community, and according to them, they are very useful.
1. Refresh Windows Update By Removing SoftwareDistribution Folder
When new Windows updates are available, your computer will download them and keep them in a folder called SoftwareDistribution. Then uses those downloaded files to install into your computer.
The full address of it is:
C:\Windows\SoftwareDistribution
However, if one of those downloaded files is corrupted, Windows Update can’t install updates correctly and will be stuck somewhere. As a result, it will lead to a high CPU or Disk usage issue on your Windows computer.
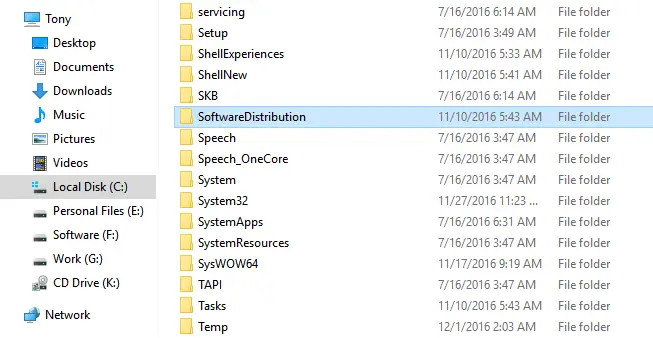
To get rid of it, you need to remove the “SoftwareDistribution” folder out of your computer and then check for updates again. This move will help to clean up all downloaded files and force Windows Update to download all those files again.
To get started, press Windows + R, type: services.msc, and then search for “Windows Update” and stop this service from running.
Otherwise, you may not be able to delete the SoftwareDistribution folder.
After stopping Windows Update from running, go to C:\Windows\ and then search for the SoftwareDistribution folder and delete it. Then reboot your Windows PC and check for updates again.
2. Restart Windows Update Service
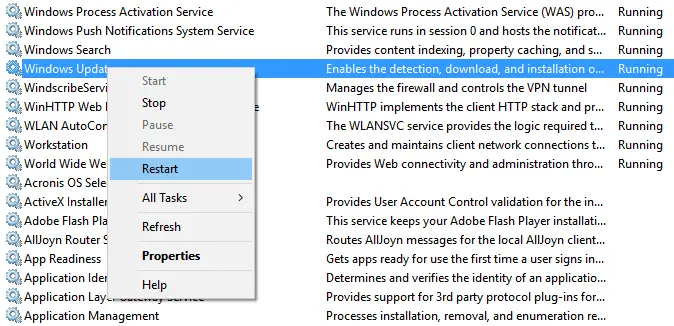
Sometimes, a simple restart of the Windows Update service will help you fix this irritating issue. You just need to press Windows + R to open the Run dialog box, then type: services.msc to open Windows Service application.
In the next step, find Windows Update, right-click on it and then select the “Restart” option from the context menu.
That’s it!
3. Use Windows Update Troubleshooter
Many Microsoft experts recommended using Windows Update Troubleshooter to diagnose and troubleshoot all problems related to Windows Update automatically.
If the problem isn’t too complicated, this troubleshooter is very handy to assist users to get rid of most issues regarding Windows Update, like the one that’s caused by the Windows Modules Installer Worker system process.
To use this troubleshooter, find it from the following path:
- Control Panel -> Troubleshooting -> View all (left panel) -> Windows Update
After launching the Windows Update Troubleshooter, click on the “Next” button and then follow the instructions on your screen to diagnose and resolve your Windows Update issue automatically.
4. Use System File Checker Tool To Scan And Fix Corrupted System Files
If one or some system files related to Windows Update are corrupted, your computer may be confronted with high resource usage problems.
To fix it, use the System File Checker tool to scan and repair those files automatically.
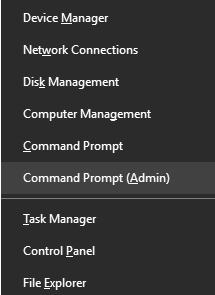
To get started, press Windows + X to bring up the context menu, and then select the “Command Prompt (Admin)” option to open Command Prompt as an administrator user.
In the Command Prompt application, execute the following command to run the tool:
- sfc /scannow
and then press the Enter key.
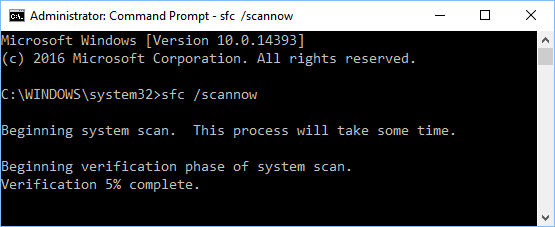
The System File Checker tool will start to search for corrupted or missing system files on your Windows computer, and then repair or replace them if possible.
You have to wait until the process is complete and then reboot your computer. While the SFC tool is working, please don’t interrupt it, such as shutdown or reboot, as it could cause more damage than good.
Here’s a short video summary guide about using system file checker:
5. Use DISM Tool To Find And Fix Windows Corruptions
You might have known the DISM Tool with a different name: System Update Readiness Tool, which is often used to help Windows users to scan the whole Windows OS for corruption and resolve it automatically. Especially, this tool is a good option when the SFC tool finds corrupted system files, but can’t repair them.
To use this tool, press Windows + X, then select the “Command Prompt (Admin)” option.
In the next step, perform the following command below to run the DISM tool:
- Dism.exe /Online /Cleanup-Image /Restorehealth
or you can also use this command:
- Dism /Online /Cleanup-Image /RestoreHealth
After that, you’ll have to wait for the DISM tool to scan your computer and resolve any corruption if it exists.
Then restart your computer and check again whether the high computer resource usage issue that was caused by the Windows Modules Installer Worker process has been gone or remains.
Windows Module Installer Worker Using SFC and DISM Tool
According to experts from Microsoft Community, using both the SFC and DISM tool to scan for, and fix corrupted Windows system files also helped to resolve many other high resources usage issues that were caused by CompatTelRunner.exe, Svchost.exe, TiWorker.exe, WmiPrvSE.exe, or ntoskrnl.exe.
That’s it!
I hope these solutions may help you get rid of the annoying issue you are encountering on your Windows PC, caused by the Windows Modules Installer Worker system process.
Disabling the Windows Update service will absolutely help you to get rid of this problem immediately.
However, you can’t use this feature to check for updates and install new features, as well as fix bugs or improvements in your computer.
If you have any questions regarding this article or the Windows Modules Installer Worker process, let me know by leaving your comment below.