Disclaimer: This post may contain affiliate links, meaning we get a small commission if you make a purchase through our links, at no cost to you. For more information, please visit our Disclaimer Page.
Most of the time, Windows machines are simple and reliable.
Unfortunately, when things do go wrong, they are not always easy to fix. We’ve recently heard complaints from people saying their Windows computer is using 100% of their disk drives.
This results in painfully slow performance.
It seems that the latest version of Windows (Windows 10) has an issue with physical drives. Somehow, those drives are being overworked. This problem leads to slow down the Windows operating system. It happens with all types of drives, including both solid-state drive (SSD) and hard disk drive (HDD).
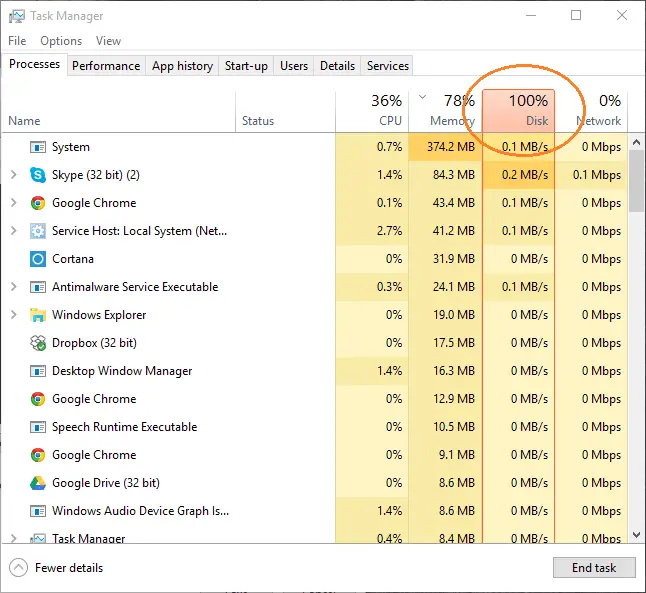
If you suspect your computer is running slowing than it should, look at the Disk column in Task Manager. If you’re at 100% and you’re not running a lot of applications, there’s an issue.
Unfortunately, there is no way you can find out which program causes this issue within Task Manager. Therefore, in this article, we’ll show you a few methods you can use to diagnose and resolve 100% disk usage in Windows 10.
Table of Contents
1. Turn Off Windows Search
The first thing you need to disable Windows Search. According to many Windows experts, there is a bug in Microsoft’s Windows 10 operating system that results in a kind of searching loop. Basically, you’re computer continually searches for no reason, using more memory than needed. This problem leads to an increased load on the physical system drive.
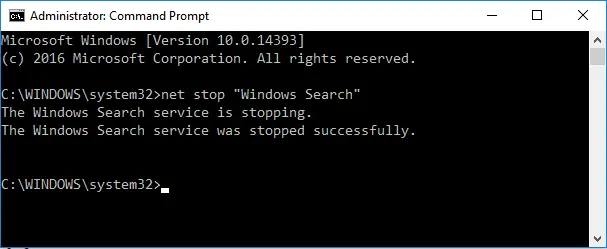
To turn off Windows Search temporarily, press Windows + X, then A and choose Yes in the dialog box that pops up.
Note: There’s no dialog box in case of UAC (User Account Control) is disabled.
In the Command Prompt window, type: net.exe stop “Windows Search” and then hit Enter.
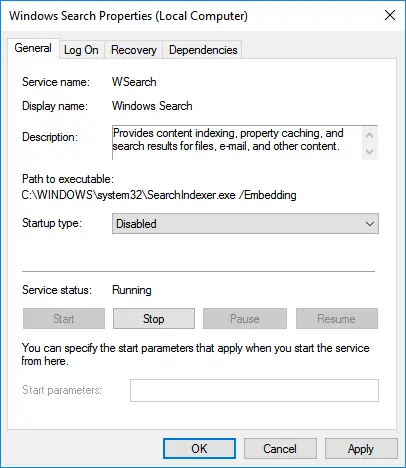
In case of disabling Windows Search permanently, press Windows + R, type: “services.msc” without the quotes and press Enter.
In the Windows Service window, search for Windows Search, double-click on it, choose “Disabled” from the Startup type drop-down menu and then press OK.
After turning off Windows Search in Windows Windows 10, the disk performance should considerably improve. The Windows 10 100% disk usage problem should be gone. Otherwise, move on to the next method.
Also Read: Fix Svchost.exe (netsvcs) High CPU Usage or Memory Leak Issues.
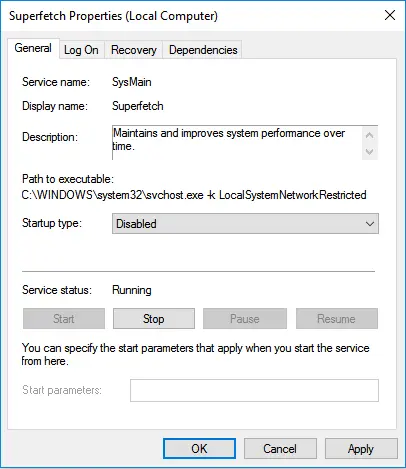
2. Turn Off Superfetch
Sometimes, the Superfetch service in Windows has been determined as the potential reason for this 100% disk usage issue in Windows 10.
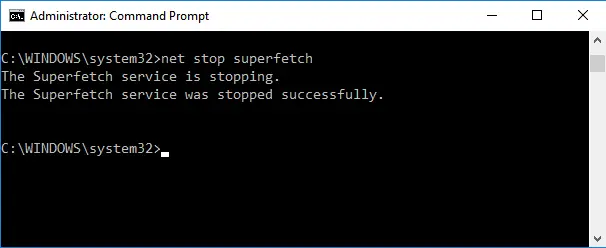
You can turn off Superfetch with the “net.exe stop superfetch” command in Command Prompt, without the quotes.
To disable Superfetch permanently, navigate to Windows Service (follow the method above), and search for Superfetch. After that, double-click on it, select “Disabled” from the Startup type drop-down list and then press OK.
Check again whether the problem remains or not. Otherwise, move onto the next step!
3. Run Check Disk with Command Prompt
To get started, launch Command Prompt with the administrative privilege by pressing Windows + X, then press A and select Yes.
In the Command Prompt, type: “chkdsk.exe /f /r” without the quotes and press Enter.
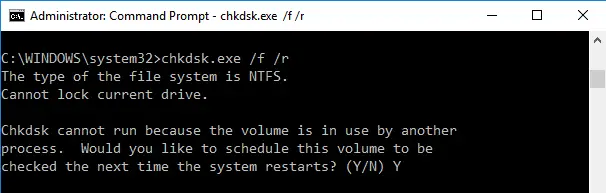
Sometimes, you will be informed that you need to restart the computer for using check disk. Just close all running programs and reboot the PC.
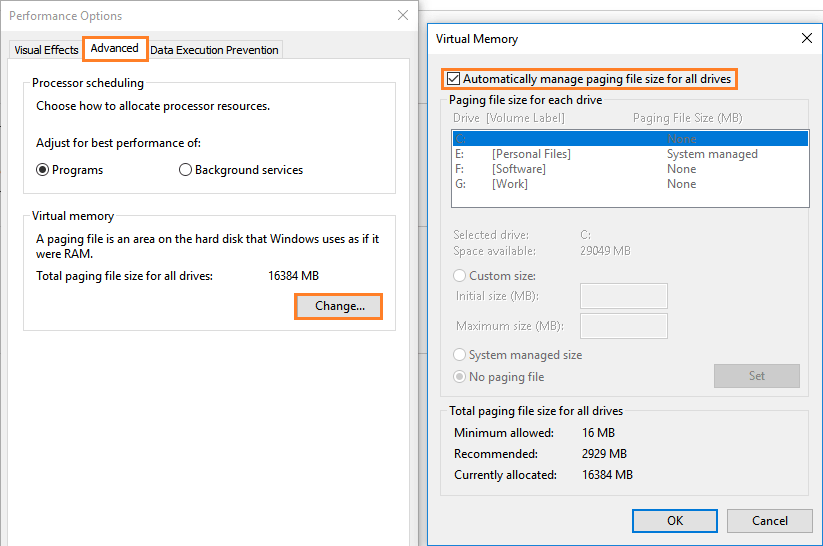
4. Reset Virtual Memory in Windows 10
Virtual memory uses your disk as RAM. When your computer runs out of RAM, it will use your system drive to store files temporary and will swap those files back when required. Therefore, it can be considered as the physical memory despite the fact that the performance can’t be the same.
However, if something goes wrong with the pagefile.sys, it can cause 100% disk usage issue on your Windows 10 computer. That’s the reason why you need to reset/reconfigure virtual memory settings to make sure everything is fine.
- To get started, press Windows + E, look at the left sidebar, search for your computer name (or This PC, in case you haven’t changed it yet).
- Right-click on it and choose Properties.
- In the System window, look at the left sidebar and click on “Advanced system settings“.
- From the Performance section, click Settings.
- Then select Advanced tab, and click on the “Change” button.
- Make sure the box named “Automatically manage paging file size for all drives” is checked.
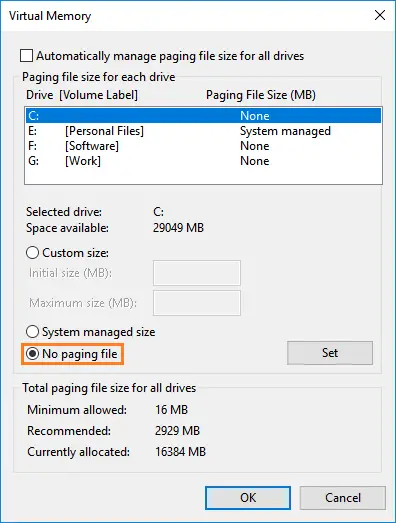
Tip: To verify whether the virtual memory is the cause of Windows 10 100% disk usage problem or not, you can uncheck the box (mentioned above), choose “No paging file” and press OK. After that, rebooting your computer to see the result.
5. Remove All Windows Temporary Files
I would strongly recommend you to remove all temporary files and then reboot your Windows computer. According to a few suggestions from users on Microsoft forum, cleaning up all Windows temporary files will help to resolve 100% disk usage issue in Windows 10.
To do so, press Windows + R, type: temp and press Enter.

After that, choose all files in the temp folder and then delete them.
Reboot your Windows computer.
That’s it!
Also Read: Fix WUAUSERV (Windows Update) High CPU Usage Problem.
6. Temporarily Turn Off Your Antivirus Software
If you use any antivirus software, anti-malware programs or internet security applications, I would recommend you to temporarily disable them to test if disk performance is back to normal or not.
In case your antivirus application is the cause, you can replace it with another on the list of best free antivirus software for Windows. You also can advise the provider of the application to see if they can give you some help.
If you don’t use any third-party antivirus programs but Windows Defender, you also should disable it to see whether it’s the cause or not. A friend told me that the Cloud-based protection of Windows Defender in Windows 10 sometimes occupies a lot of I/O and network usage, which may cause 100% disk usage problem.
To disable Windows Defender, navigate to Settings -> Update & security -> Windows Defender.
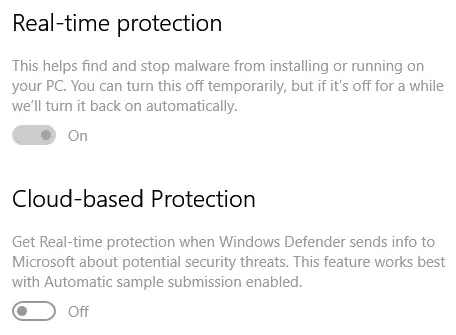
Turn off both “Real-time protection” and “Cloud-based protection” options.
7. Change Settings in Google Chrome and Skype
I’ve tried this method, however, according to some reports from users, after changing the following settings in Google Chrome and Skype applications, the Windows 10 100% disk usage issue disappears and disk performance is back to normal.
Therefore, if all the methods above don’t work with you, try to change these settings in Google Chrome and Skype.
7.A.
In the Chrome browser, go to Settings -> Show advanced settings. Under Privacy section, uncheck the “Prefetch resources to load pages more quickly” option.
7.B.
- Navigate to C:\Program Files (x86)\Skype\Phone\, right-click on the Skype.exe file and select Properties.
- In the next step, choose Security tab and then click Edit.
- From the list of “Groups or user names“, choose “ALL APPLICATION PACKAGES“, check the Write option to be Allow, which allows Skype to write to your disk.
- After that, press OK.
Now, get back to Task Manager to see if the 100% disk usage problem is gone or not.
Tip: You also should disable flash in Google Chrome because sometimes it can occupy a lot of I/O usage and cause 100% disk usage issue in Windows 10.
Conclusion
Typically, your computer will never use up to 100% performance of your disk. In case you can’t fix Windows 10 100% disk usage issue by using the methods above, then the problem may be your hardware, especially your HDD/SSD. Possibly, your hard drive is getting old, and it’s time to replace it.
Besides, the high disk usage problem could be related to the defrag tool in Windows 10. Sometimes, your computer is trying to defrag the drive. However, it’s actually a solid-state drive instead of a hard disk drive. You can press Windows + Q, type “Task Scheduler” without the quotes and disable the scheduled disk defrag task, if available.