Disclaimer: This post may contain affiliate links, meaning we get a small commission if you make a purchase through our links, at no cost to you. For more information, please visit our Disclaimer Page.
Do Not Disturb mode is a highly convenient tool, especially for those who love their sleep or need time throughout the day to focus on their work, distraction-free. On iOS devices, Do Not Disturb Mode is better known as “Focus”. However, we’ll stick with the Do Not Disturb version for continuity and to avoid confusion for Android and iOS.
Either way, it’s a fantastic option for automation until it wants to get quirky and turn off whenever it wants to. Do Not Disturb is hardly useful if you turn it on, get busy doing your work, and you get an incoming spam phone call five minutes later.
Do Not Disturbed mode is either an automated feature or you can simply turn it on and off. However, it should never turn off on its own. If you’re having this problem repeatedly, we’ve put together a few troubleshooting tips to iron out the kinks and figure out what’s causing it to turn off on its own.
Table of Contents
4 Android & iPhone Ways to Tackle Constant Do Not Disturb Turn-Offs
1. Check the Schedule
On either Android or iOS devices, you can set up a Do Not Disturb schedule. Once you do that, under normal circumstances, the smartphone will go into Do Not Disturb mode and turn it back off based solely on the timeframe you set up.
If you use Do Not Disturb mode a lot, it’s easy to build up a number of schedules, and it can get pretty convoluted if you have automatic schedules set up throughout the day. It’s worth checking first and foremost. If nothing else, you can rule that out from the very beginning.
Android
- Open the Settings Menu
- Select Notifications
- Select Do Not Disturb
- Select Schedules
- Look over set schedules created in the past and make sure none of them are toggled on
- You can edit (create or delete) schedules from this screen
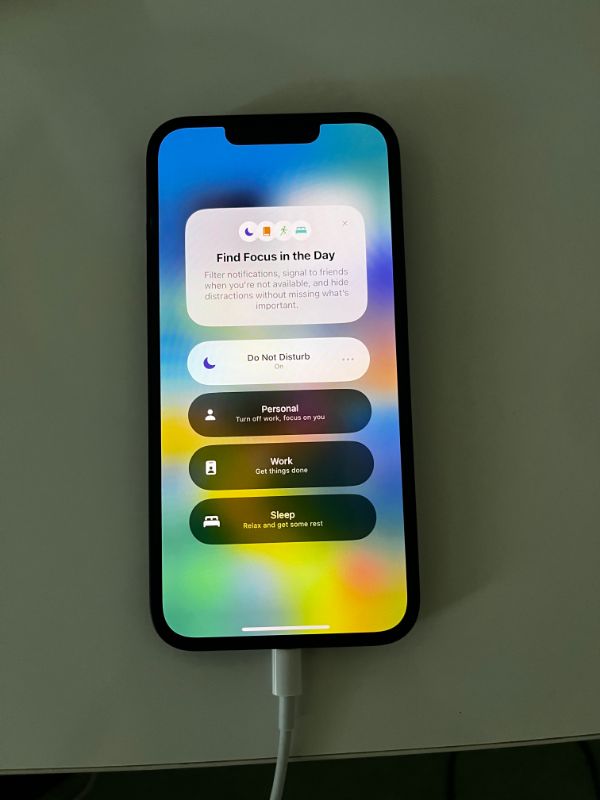
iOS
- Open the Settings Menu
- Scroll down and select Focus
- Select Do Not Disturb
- Scroll down and look at your Set a Schedule Section to determine whether you have any schedules automatically running
- You can create focus filters, set new schedules, delete old ones, customize your screens, and set up people who can call or text through your Do Not Disturb setting.
You might be surprised how often this happens, especially if you are no stranger to the Do Not Disturbed feature in either an Android or an iOS device.
Just ensure all of your toggles are off and you don’t have any conflicting time schedules.
2. Disable the Feature
While this isn’t a long term fix, it’s a simple option to get things under control while you figure out the underlying problem. Besides, if the thing is turning off when you don’t want it to, it’s not exactly helping you out any.
Android
- Open the Settings menu
- Select Notifications
- Select Do Not Disturb
- Toggle it off
iOS
- Open the Settings menu
- Select Focus
- Select Do Not Disturb
- Select Smart Activation and toggle it off
- Select the time schedule and toggle it off
If, over time, you’ve built up quite a number of various schedules, it may be the best time to turn the setting off, go through and delete all the schedules, and start over with a more organized setup.
You can work through the automated Do Not Disturb scheduling for each day of the week.
If you’ve been using it prior, you probably created schedules on the fly. It’s better to sit down and take the time to go through it with a more organized goal.
3. Make Sure Your Firmware is Updated
If your Do Not Disturb is turned on, and you have a single schedule made, it shouldn’t turn off when you least expect it to. Oftentimes, when you fail to keep your firmware updated, the simplest and most dependable apps start acting up.
Most smartphones should come out of the box, brand new, with the default feature set to automatic updates. Both Android and iPhone models should automatically download newly released software updates and install them without you needing to check.
However, just like with Do Not Disturb mode, you can set the time periods throughout the day when the phone updates. However, most phones won’t automatically update if the battery is too low.
If you have your update set to 5 pm every day, odds are good your battery isn’t up to the task, and you’ll get behind on the updates.
Sometimes, it’s best to just check and do it yourself.
Android
- Open your Settings menu
- Select About Phone
- Select Android Version
- Select Android Security Update
- Update your phone if one is available
There are a bunch of different Android devices out there, and not all of them are the same when it comes to accessing the settings. However, the above bullet points are pretty standard fare. Android devices, regardless of manufacturer, make accessing Settings features pretty simple, so you shouldn’t have much of a problem.
iOS
- Open the Settings menu
- Select General
- Select Software Update
- If one pops up, go ahead and update
In either Android or iPhones, you can turn the automatic updates on or off when you’re in the firmware update screen. Oftentimes, it’s much better to just do the firmware updates yourself because automated updates are often finicky.
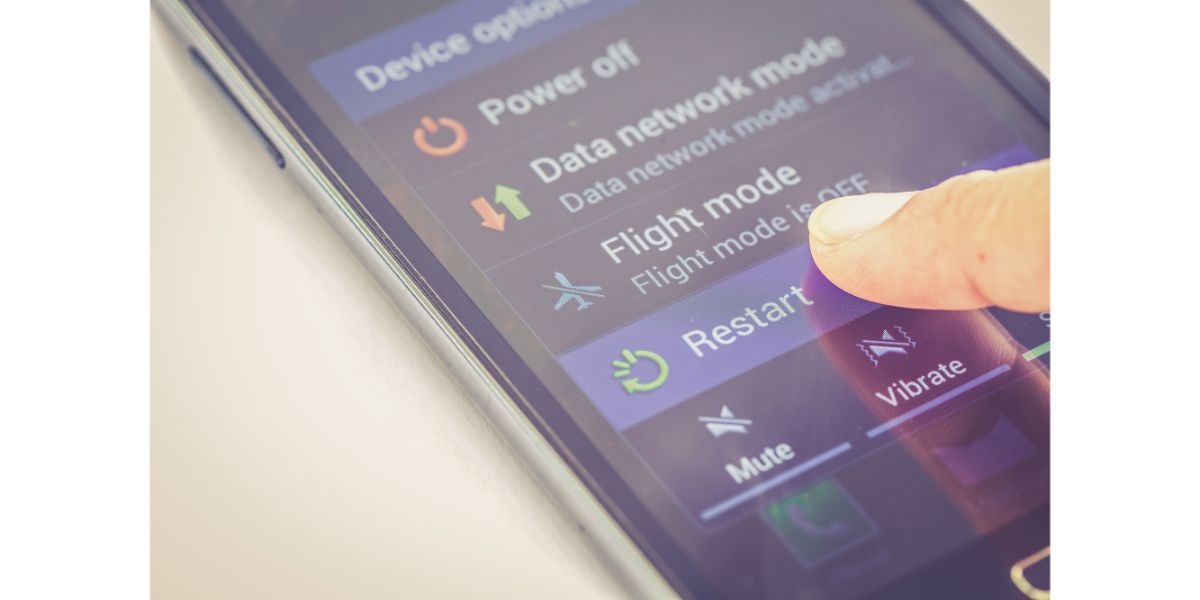
4. Restart Your iOS or Android Device
Sometimes a simple reset will do the trick when all else fails. Whether you own an Android or an iPhone, simply turn your phone off, wait a few minutes, and turn your phone back on. Of course, you can do a standard reset within the phone, but it amounts to the same thing.
The other reset options typically include a network reset and a factory reset. The network reset will eliminate all of your Wi-Fi connections, Bluetooth, and things of that nature. You’ll need to log into your router and pair your Bluetooth devices all over again.
A factory reset is pretty much what it sounds like, resetting your phone to its condition the day it came out of the box.
You want to ensure your phone is backed up before you do a factory reset, or you risk losing all of your saved information, documents, pictures, etc.
You can start with a standard reset, which is just a matter of turning your phone off and back on again, or resetting it from the settings menu. If that doesn’t work, you can try a network reset.
However, a network reset is not really associated with your Do Not Disturb mode.
A factory reset is the option that’s most likely to solve your Do Not Disturb problem. However, since your phone will lose everything, that’s not the most palatable option.
If you really need Do Not Disturb and have done all the other troubleshooting tips above, including the resets, this may be your only remaining option.
Final Thoughts
Obviously, your Do Not Disturb option is not supposed to turn off on you at random. It’s not supposed to turn off at all unless you want it to. Determining whether you have an automated schedule without realizing it is the first step.
After that, hopefully, the above troubleshooting tips will set you back on the right path so you can start being more productive without worrying about consistent interruptions.