Disclaimer: This post may contain affiliate links, meaning we get a small commission if you make a purchase through our links, at no cost to you. For more information, please visit our Disclaimer Page.
Any strange sound coming from a laptop is sure to make us nervous, especially if it’s a rattling coming straight from the laptop fan. If you aren’t careful, this noise could escalate into a much bigger problem – including a broken laptop.
Let’s check out the 4 reasons a laptop makes this noise and learn the 8 ways to fix it.
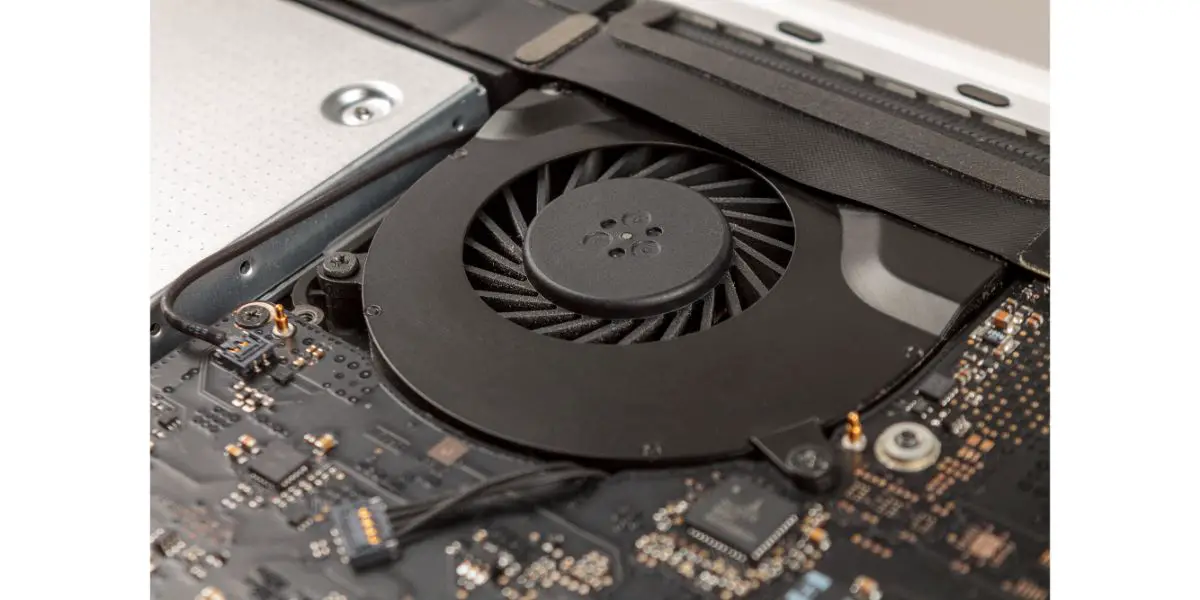
Table of Contents
4 Causes of the Rattling Noise
A rattling fan in a laptop occurs when one of its internal bearings fails. This could be a sphere, bearing, or axle. The bearing typically grinds up against another component in the assembly and makes noise.
There are four main reasons an internal bearing may fail. The primary causes are dust build-up, obstructed vents, loose attachments, and fan damage.
1. Dust Build-Up
Over time, dust is sucked into your laptop and builds up on the hardware. Most users don’t know that they should clean the inside of their laptops every 6 to 12 months.
If your laptop is always in the same position and you don’t move it much, this is even more important as dust will accumulate on the fan blades over time.
2. Obstructed Vents
Most laptops have a series of vents on the sides or bottom of the device. The vents on your computer expel warm air to work alongside the fan and cool the system. If the vents are obstructed, the computer could overheat and put more pressure on the fan.
Dirt and other objects could block your vents. Putting your laptop on an uneven surface, like your lap, could also block the vents for a long time.
3. Loose Attachments
If you’ve changed parts of your computer on your own, had it repaired, built it, or just bought one with a manufacturing error, you may have a loose attachment within the laptop. An improper installment or loose screws could cause the fan blades to hit other parts of the laptop – usually the fan case – while in motion. This would almost certainly cause a rattling, scraping, or grinding sound.
4. Fan Damage
If your fan isn’t lubricated and builds up grime, parts of it could corrode over time. If you’ve dropped your laptop, banged it in transport, or had another mishap with it, the hardware may have suffered physical damage. Any internal break in your laptop could loosen a part to cause the rattling noise.
8 Fixes for a Rattling Laptop Fan
There are eight ways you can remedy a rattling laptop fan.
1. Remove Background Processes
If your computer is a Mac, a rattling fan could signal that you’re overexerting your device – especially the CPU or video card. If you’re running background programs without knowing it, this strain could cause excessive heat that makes it more difficult for the fan to function properly.
Open up the task manager to see what programs are running and shut down all of them to see if this alleviates the noise. You can also do this on a PC.
MAC users can also reset their System Management Control (SMC), which manages low-level settings like battery and thermal settings. Press the shift-control option on the left of your keyboard and the power button at the same time for 10 seconds.
2. Complete Hardware Diagnostics
Completing a boot diagnostics test will put your laptop under a stress test. This can test for faults in the hardware.
First, restart your computer. When it boots back up again, you’ll need to press a key to run the diagnostics.
- Dell: F12
- HP: Esc
- Apple Macs: D
If you have a different brand of laptop, you can Google “[your brand] boot diagnostics button” to learn how to run diagnostics.
If your laptop reports that you have a fan failure, you may need to replace the fan but first, run through the following fixes to see if they help.
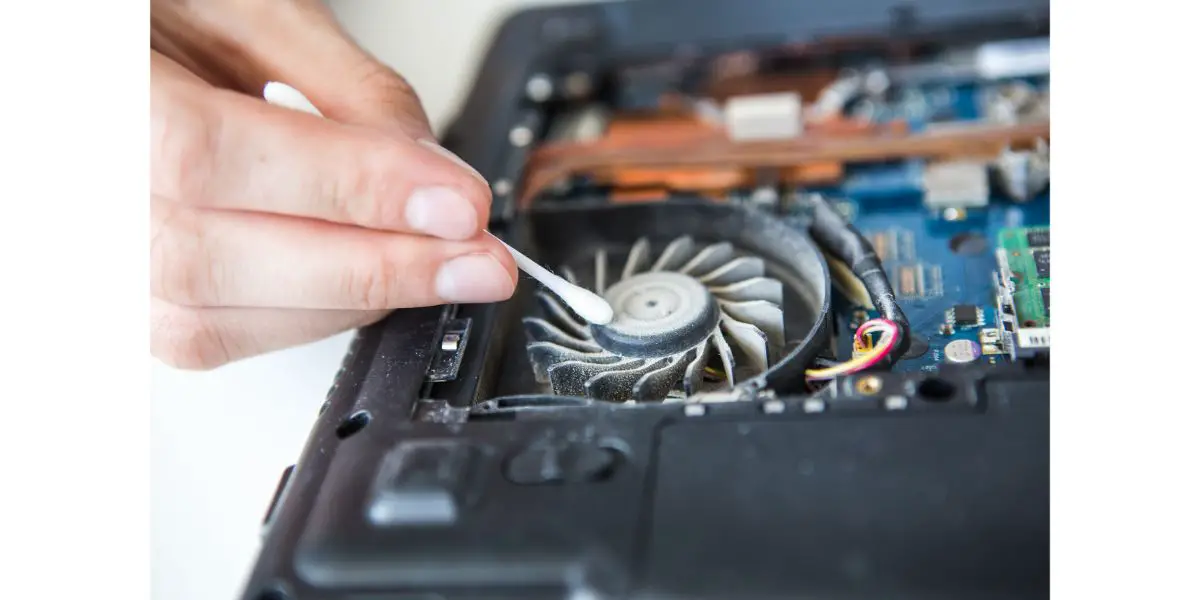
3. Clean Your Fan
If you haven’t cleaned the inside of your laptop in a while – or ever! – this step is important. There are a few tips to keep in mind before proceeding:
- Don’t use any water-based solutions
- Use a compressed air can, rubbing alcohol, and lint-free cloths
Open up your laptop gently and clean out the dust inside. You should use a lint-free cloth with rubbing alcohol or a small soft brush. You can also combine this with compressed air to blow any dust that you can’t reach with the cloth.
4. Clean Your Vents
The vents on your laptop are like our mouths and nose – they are the vital openings that let air flow through your laptop to ensure proper cooling. Use a Q-tip, cloth, or compressed air to make sure these vents are clean and unobstructed. Don’t block them with any other items when using your laptop.
5. Tighten Screws
Like with any machine, laptops are also prone to wear and tear and manufacturing flaws. If your CPU fan was not installed properly, a loose screw may cause wobbling. As the fan spins and wobbles, it could hit the case and cause a rattling or grinding noise.
Open up the back of your laptop and inspect the hardware. If you find any loose pieces or screws, make sure they’re tightened and fixed properly.
6. Lubricate the Fan (If Possible)
Some fans may have friction on the bearing, causing a rattling sound. Adding a drop of oil to the fan could get it back up and running normally again. The better lubricated the bearings, the more efficiently a fan can spin and cool your laptop.
Oils that repair and clean, like WD40, could be applied to certain parts of the fan to prevent corrosion and ease movement. These oils also cut through dust particles.
Most fans can be lubricated, but an internal reservoir oiled bearing may not respond well to oiling. If your laptop has these bearings, avoid lubricating the fan.
7. Replace the Thermal Paste
This is a fix that should be done by those who are comfortable managing the internal hardware of their laptop. If you are hesitant to do so, move on to fix #8 without worry.
For the hardware-savvy laptop users out there, you may be familiar with thermal paste, which acts like a thermal insulator to eliminate air spaces in different places. First, you’ll need to disassemble your laptop enough to reach the gaps between the heat sinks and the CPU/GPU. Clean out the old thermal paste with rubbing alcohol and apply the new paste. Let it set and reassemble your laptop.
8. Replace the Fan
You may be able to replace just one part or have to replace the entire fan in your laptop as the ultimate fix. You can do this yourself via online video guides with a bit of preparation and a chunk of patience. Alternatively, you can always take your laptop to a tech repair shop for a professional hand and consultation.

Tips to Avoid a Rattling Fan
If you were able to fix your rattling fan, there are a few steps you can take to make sure it doesn’t start up again in the future.
First, be sure to turn off your computer when not in use, especially if it’s idle. This will help keep it cool and prevent the fan from excessive use.
Next, add some vibration-absorbing material to the bottom of your laptop. You can buy this specifically for laptop use. It will absorb your computer’s vibrations and lower the wear and tear on your laptop’s hardware during extensive use.
Next, change your computer’s position now and again. If you have a laptop support, this could mean positioning it on a slant instead of flat and vice versa. This will change the way dust accumulates on the fan as well as the airflow. You can also install a quality case fan to improve functionality.
Be sure you don’t put other items on your laptop when it isn’t being used, and never block the vents with other objects around your computer. Also, when disassembling and reassembling the device, ensure no cables touch the fan blades.
Final Thoughts
When you start to hear a rattling, especially in the fan of your device, it’s a cause of concern that dust build-up, blocked vents, loose attachments, or fan damage could cause.
First, turn off all running programs and complete a diagnostics run to fix this. Then, clean your laptop and vents, tighten any loose parts, and lubricate the fan if possible. Finally, consider replacing the thermal paste or the fan on your own or through a professional tech service.