Disclaimer: This post may contain affiliate links, meaning we get a small commission if you make a purchase through our links, at no cost to you. For more information, please visit our Disclaimer Page.
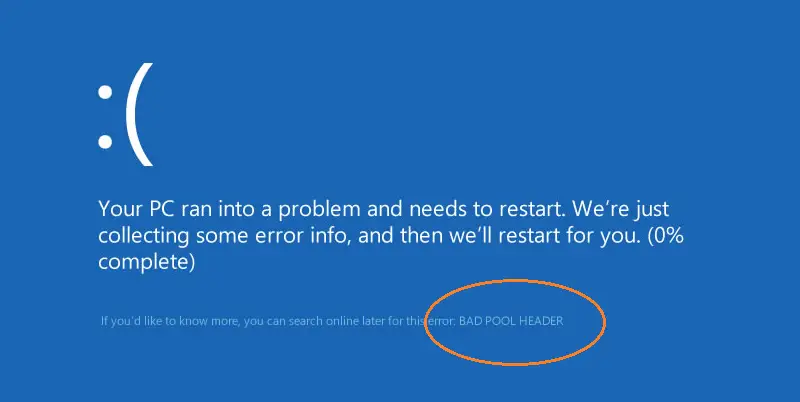
Bad Pool Header is a common blue screen of death error that can occur in all versions of Windows, including Windows 7, Windows 8, 8.1, and Windows 10.
There are many causes of bad pool header errors, including physical memory problems, corrupted Windows registry entries, viruses & malware, or incompatible apps.
Bad pool header error codes are often temporary, and a simple reboot fixes the problem. However, sometimes the error can be more permanent, which can be a major headache for computer owners.
If restarting your computer doesn’t correct the error, you’ll have to diagnose and resolve the problem yourself.
In this guide, we’re going to share a few methods you can use to attempt to fix a bad pool header error.
Table of Contents
What Does Bad Pool Header Mean?
The bad pool header error refers to your computer’s memory pool. If you get this common error, it means your machine is having trouble allocating enough memory to properly run an application, typically because the memory pool is corrupt.
Common Reasons That Can Cause Bad Pool Header BSOD Error
While there are many causes, here are the most common causes that lead to Bad Pool Header error:
- Corrupted Windows system files.
- Damaged or incompatible device drivers.
- Bad RAM or HDD/SSD.
- Damaged Windows Registry entries.
- Viruses & Malware.
- Anti-virus & anti-malware programs.
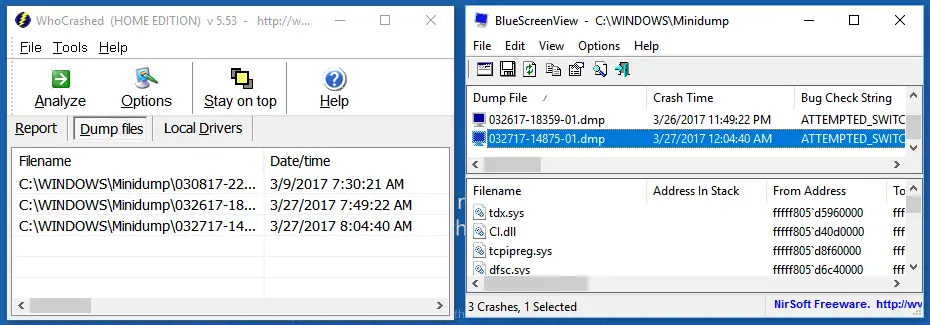
To help you figure out the cause faster, you can download WhoCrashed or BlueScreenView and install them on your Windows PC to analyze and find the reason.
Both are free utilities that help to scan for MINIDUMP files and analyze them and show you the report. Based on the report, you will know where the blue screen error comes from and which system file or Windows driver causes it.
If you are unable to access your computer in regular mode, I would recommend booting your Windows into Safe Mode and do all the steps there. Don’t know how to do it? Here are a few methods you can use to boot into Windows 10 Safe Mode.
Methods You Can Use To Fix Bad Pool Header BSOD Error In Windows 10
Note: These methods are not only used for fixing this type of BSOD error in Windows 10, but also can be used to resolve the same problem on your Windows 7 and Windows 8, 8.1 PCs. Therefore, if you are encountering Bad Pool Header error on your computer that doesn’t run Windows 10, don’t hesitate to use these methods to resolve it.
Tip: Before using any methods below, restart your computer to let it recover automatically. Sometimes, if the issue isn’t serious, such as an interruption when allocating memory, then Windows will automatically repair and recover itself.
1. Disable Windows Indexing Service To Fix Bad Pool Header BSOD
According to several reports from Microsoft Community users, after disabling Windows Indexing service, this type of BSOD no longer appears on their computer.
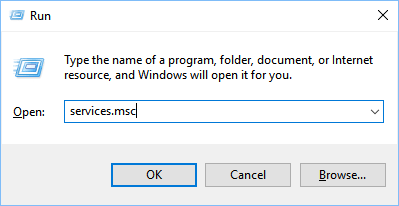
To disable the Windows Indexing service, press Windows + R, type: services.msc and then press Enter.
Tip: You can also access Windows Services by navigating to Control Panel -> Administrative Tools -> Services.
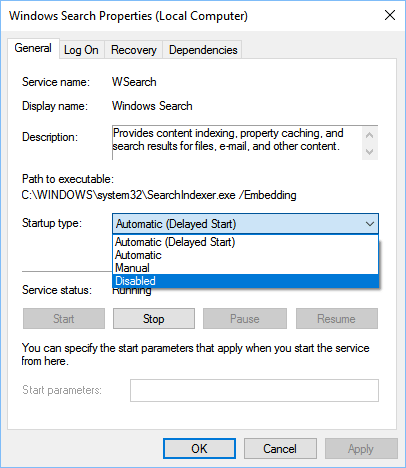
In the Windows Services application, search for Windows Search on the list of all Windows services, then right-click on it and choose the Properties option.
In the next step, select “Disabled” from the Startup type drop-down list, then click on the “OK” button.
Reboot your Windows PC to see whether the Bad Pool Header BSOD is gone or has persisted. If it’s still there, use the other methods below.
2. Disable Fast Startup In Windows 10
By default, the Fast Startup option will be enabled, and in several cases, causes this type of BSOD.
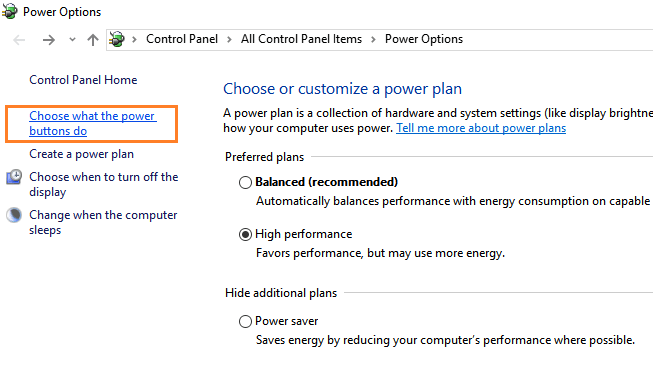
To turn off the Fast Startup option, press Windows + X and then choose Power Options from the pop-up menu.
In the Power Options window, select the “Choose what the power button does” option from the left sidebar.
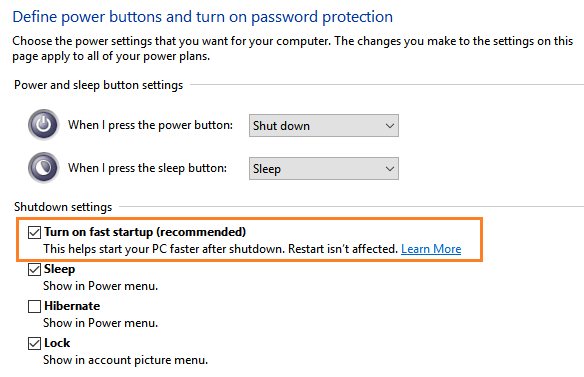
In the next step, click on the “Change settings that are currently unavailable” option. Then uncheck the “Turn on fast startup (recommended)” box, click on the “Save changes” button and restart your computer to see if the issue persists.
Can’t find “Turn on fast startup (recommended)” option? Read this article to learn more about Fast Startup and how to show this option.
3. Disconnect All Connected External Devices Except Your Keyboard And Mouse
Sometimes, when you connect a new external device, and it’s not fully compatible with your Windows computer, it may create a Bad Pool Header BSOD error.
To test, temporarily disconnect all connected external devices plugged into your computer, except your keyboard and mouse. Then, reboot your computer to see if the error persists.
If this BSOD is gone, one of those external devices is the cause. To identify the specific device, reconnect them one by one until you find it.
4. Undo Recent Changes On Your Windows Computer
If you recently installed a new program on your Windows PC and Bad Pool Header occurs, uninstall it. That program may conflict with other installed apps on your computer and lead to this type of BSOD.
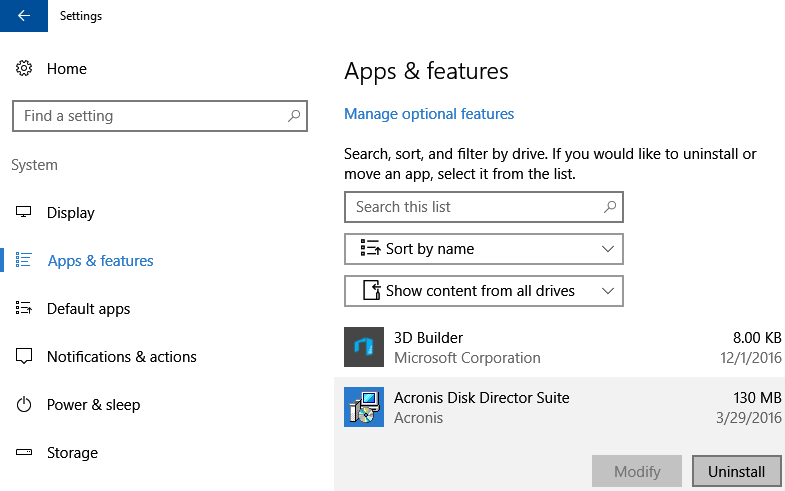
To uninstall apps in Windows 10, navigate to Settings -> System -> Apps and features.
Search for the application that you have recently installed, then select it and click on the “Uninstall” button.
Tip: In some cases, third-party antivirus programs can cause this type of BSOD. Therefore, you can temporarily turn off your third-party antivirus and reboot the computer to see if the issue persists. If this move helped to correct the problem, you should consider removing that antivirus software from your computer and search for a replacement.
5. Scan And Repair Corrupted Windows System Files
A damaged Windows system file can also lead to a Bad Pool Header BSOD. Perform the SFC command to scan for corrupted files on your computer and repair them automatically.
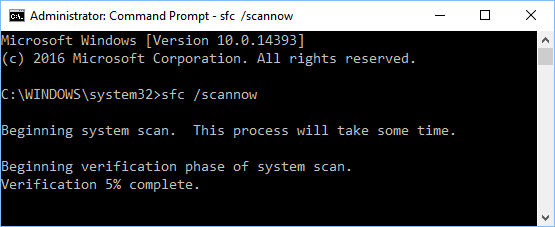
To get started, press Windows + X, then press A and choose Yes to launch the Command Prompt application with the administrator account.
In the Command Prompt window, execute the following command to scan all the Windows system files and repair them automatically if any corruption is found.
SFC /scannow
This process may take a while to complete. Please don’t restart or shutdown your computer while the process is working.
6. Update Or Reinstall Windows Drivers
As recommended above, you can use BlueScreenView or WhoCrashed tool to figure out the cause of a Bad Pool Header error. If one of Windows drivers caused it, the tool would show you the name of the driver with the xxx.sys form.
You can easily find out which hardware it belongs to by pasting it into the www.carrona.org website. It’s a directory and will tell you the device name based on the .sys file.
After knowing the driver that caused the Bad Pool Header BSOD error, uninstall it and then download the latest version from the manufacturer’s website and install it on your Windows PC.
If you’re using Windows 10, you only need to uninstall the driver, reboot the computer and then connect to the Internet. Your Windows OS will automatically scan for missing drivers, download the updated drivers and install them.
7. Restore Your Windows PC Back To Previous Working Point
If you tried all the methods above but the Bad Pool Header BSOD error persists, use the Windows System Restore feature to roll back your computer to a selected previous working point.
Technically, it’s a lightweight backup system, which helps to backup system files and creates points that allows users to roll back the computer to a specific point, in case something goes wrong.
To learn more about Windows System Restore, as well as how to use it, read this article. If you don’t have a backup, you can always reset your Windows PC to fix Bad Pool Header error as well.
I hope this article can help you to resolve Bad Pool Header BSOD error on your Windows 10 computer, as well as other versions of Windows, including Windows 7 and Windows 8, 8.1.

