Disclaimer: This post may contain affiliate links, meaning we get a small commission if you make a purchase through our links, at no cost to you. For more information, please visit our Disclaimer Page.
People are always talking about backing up their phones. We all know it’s something we’re supposed to do, so why don’t more of us actually do it?
What does it really mean? Why is it so important?
Backing up your phone means you’ve got a copy of your files and settings saved externally for safekeeping and retrieval at a later date.
If you’ve ever lost your phone or had to restore your device, you know how heartbreaking and frustrating it is to lose your photos and files.
There are a variety of different methods you can use to support your phone. How you back it up depends on how much data you need to save.
It’s an easy process to do, and it’s one that everyone should get in the habit of doing on a regular basis.
Today we’re detailing everything you need to know about how to successfully backup your phone.
Contents:
- What Does it Mean to Backup a Phone?
- How Do I Backup My Phone?
- What Are My Other Online Storage Options?
- What are the Most Popular Storage Options
- What Steps Do I Need to Take to Backup My Phone?
- Backup Your Computer to the Cloud
Table of Contents
What Does it Mean to Backup a Phone?
A phone only has so much memory and can only hold a certain amount of data. It will take longer to max out a 64GB phone than a 32GB phone, but depending on your usage, you may reach its capacity.
You can see how much storage you are using on your phone by going to Settings ->General->iPhone Storage.

Don’t wait until you reach the capacity to secure your phone. The only way to ensure that your data is safe is to back it up on a regular basis.
iPhone users tend to think that their data is automatically backed up with iCloud. Truth is, with a free iCloud account you can only backup 5GB. For more storage, you’ll need to pay to upgrade your iCloud service.
Don’t run the risk of losing photos, files, videos, and contacts by relying on 5GB of storage in iCloud. You’ve got to have a better plan in place.
Read Article: 8 Useful Mac Shortcuts You Must Know
How Do I Backup My Phone?
There are lots of methods for backing up your phone, and everyone has their own preferences. We’re breaking down the details of what you can do to make sure your files, photos, and other data are safe on an external service or in the cloud.
Today, we’re looking specifically at the backup options for iPhone and iPad.
When it comes time to backup, iPhone users have two main choices: iTunes and iCloud.
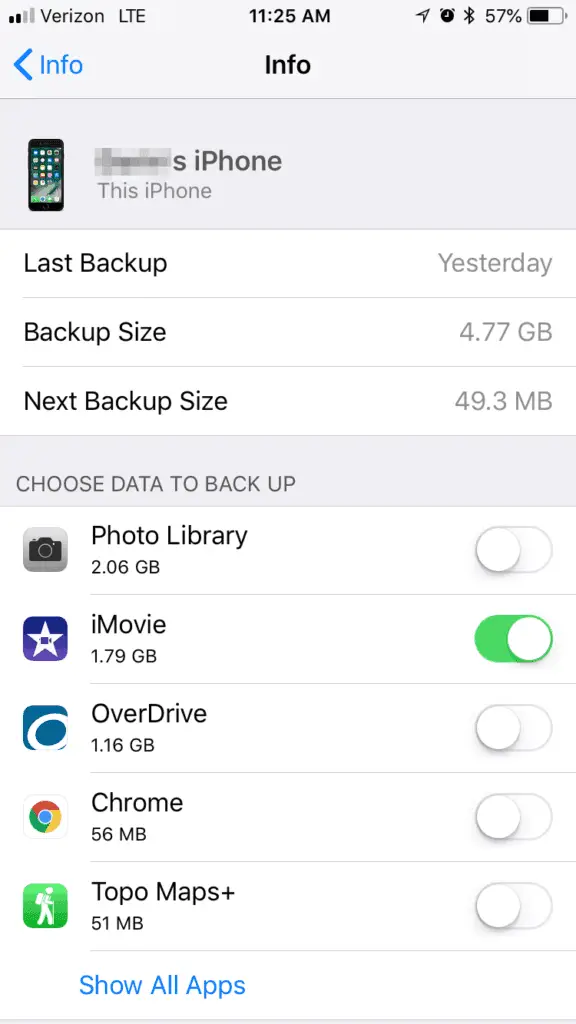
How to Do an iCloud Backup
Any iPhone running on iOS 5 or higher includes a distinct backup feature. The files, photos, and data on your phone will automatically save to iCloud, as long as you have the iCloud feature enabled and turned on.
To turn on the iCloud backup feature, connect your phone to your Wi-Fi network. Tap Settings > Apple ID -> iCloud > Backup. If it isn’t already turned on, turn it on.
With the feature turned on tap “Back up Now“.
It’s important to make sure that you’re on a Wi-Fi connection before proceeding with your backup. Remember, it’s always best to use a secure network that requires your own password to join.
To check that your backup was successful, tap Settings > iCloud > Storage > Manage Storage. From the Manage Storage menu, select your device and you should see a list that includes the latest backup you performed.
iCloud provides 5GB of memory in which to hold your files and other data. For most users, this isn’t enough. There are other ways to secure your phone’s data, but if you decide you want all files stored on iCloud you can always pay for more storage.
For $0.99 per month, you can enjoy 50GB of iCloud storage.
Need more than 50GB? Not a problem. You can upgrade to a 200GB plan for $2.99 per month. If that’s still not enough, Apple offers a 1TB plan that will add $9.99 to your monthly bill.
If you’ve got tons of files, games, and photos, it’s a small price to pay for the peace of mind that comes with knowing you won’t lose your data.
There are other online data storage services that charge less, so do your research before you agree to pay for more iCloud storage.
Before you sign up for any data storage plan, think about how much storage you might need. It’s always better to have more than you need than not enough.
How to Do an iTunes Backup
To backup your phone with iTunes, you’ll first need to have the latest version of iTunes installed on your Mac or PC. With iTunes running, you connect your phone so it can communicate with your computer. You can use connect your computer and phone with a USB cord to sync your device or you can connect through a Wi-Fi network.
Performing an iTunes backup is easy. In a few clicks, your data will save to iTunes and be accessible for future use.
First, open iTunes on your computer and connect your iPhone to that Mac or PC. Click File > Devices > Backup or click “Back Up Now” from the summary page.
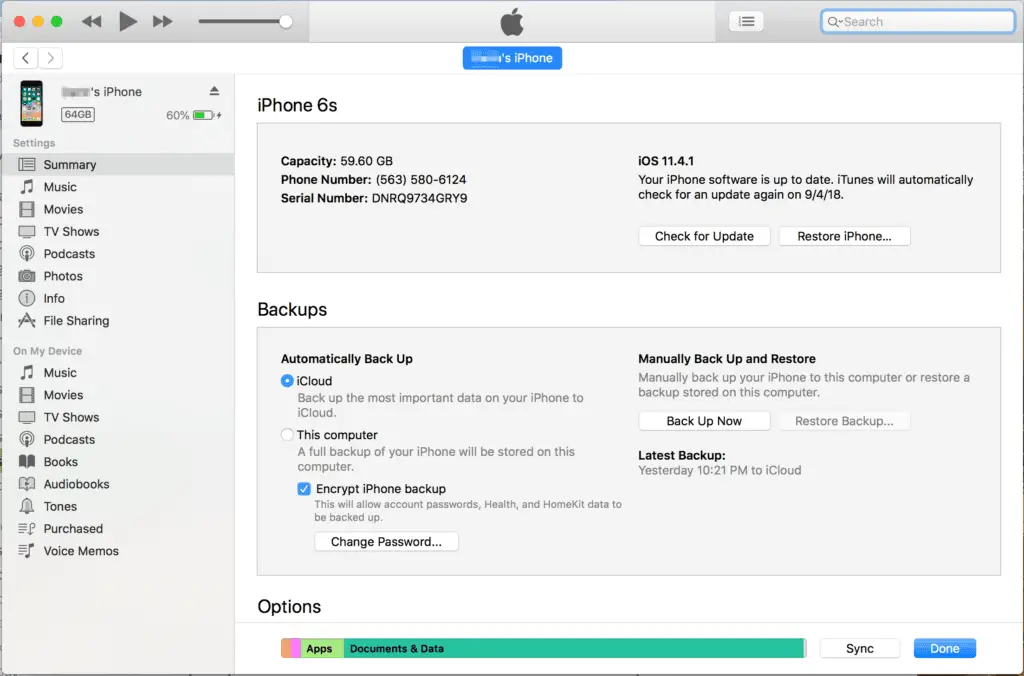
Once you click that button, your backup will begin. Keep in mind, the amount of data you need to save, the age and model of your phone, and the speed of your computer all affect how long the process takes.
iTunes is free, so it’s a great way to backup your games, videos, photos, text messages, contacts, and other data. You can do it as often as you like, but you’ll need to remember to do it.
With iTunes, you can only do a manual backup, whereas iCloud backups are automatic.
Backing up your iPhone on iTunes usually only takes a few minutes, but you have to start the process. It won’t do it for you.
There is a way to set up automatic iTunes backups, but this can use a lot of bandwidth at the wrong times and even end up turning it off.
Another important thing to remember is that you need to have enough space on your computer’s hard drive to be able to perform an iTunes backup.
If you’ve got 128GB or more on your iPhone, you may run into an issue where you might not have enough storage on your Mac or PC.
What Are My Other Online Storage Options?
There are a variety of other online storage options available for both iPhone and Android users. Some of the more popular ones include Google Drive, Microsoft OneDrive, Dropbox, and Amazon Cloud Drive.
You can run these applications on your iPhone to backup and sync all your data straight from your device into the cloud. The prices vary for these cloud storage systems, but most are less expensive than the cost of an iCloud upgrade.
Another thing to keep in mind is that you can use these online storage options for iOS and Android devices. For loyal Apple users who would never think of switching to an Android phone, this won’t make a difference. But if you think you may want to switch to an Android device in the future, you will still be able to access your data. If you backup your iPhone to iCloud or iTunes, it won’t do you much good if you make the switch to Android.
There is one drawback to using an online storage service that many users do not like. Most of them are only equipped to backup photos, contacts, and (in some cases) videos. With iTunes or iCloud you can enjoy a more comprehensive backup that saves your settings, apps, app data, voicemails, and text messages.
If you’re most concerned about saving your photos and contacts, an online storage option may be all you need. You can also use it in conjunction with iCloud storage or iTunes storage.
Backup your first 5GB of data on iCloud and when you run out of room, use your online storage to backup the rest.
And if you’re out of storage on your computer’s hard drive and can no longer use iTunes storage, this may be your best bet. It’s always a good decision to have a backup plan in place, regardless of how or how often you use it.
These online storage drives allow you to upload them from your phone or your computer. They also offer the option to create shareable files, so you can send photos, files, or documents to other people in your network.
This sharing of files can happen online or through the iPhone app for the particular storage service you use.
For the most part, you’ll have to back up most of your files and data manually. In some cases, certain services run automatic backups for the photos saved on your phone.
What Are the Most Popular Online Storage Options?
When it comes to your online storage options, Google Drive, Dropbox, and Microsoft OneDrive are some of the most popular ones. But there are many other options out there.
Before you decide on one, do a bit of research to learn the differences. There’s no point in using a storage service that can’t provide you with what you need.
Some of these services, such as Google Drive, have separate apps that include a variety of other features. With Google Drive, you can download Google Photos as a way to manage your photos online.
You can also perform tasks like setting up your mail, maintaining your calendar, and syncing your notes to Gmail.
A good way to make use of different storage systems is to use Google Photos to back up your image files only. With your photos saved on Google Drive, you can use your free 5GB on iCloud to backup texts, settings, apps, and other files.
You don’t have to commit to one method, but it will make your life easier to have all your data saved in the same place.
What Steps Do I Need to Take to Backup My Phone?
It’s always best to keep all your digital files in the same place so they’re easy to find when you need them. We recommend backing up your iPhone to your computer and then backing up your computer to the cloud.
As with your phone, you should make sure you backup your computer on a regular basis.
Start with a real-time backup: Enable your free iCloud backup and My Photo Stream on your phone to back it up as you use it.
Backup your phone to your computer: Connect your phone to your computer and backup your data with iTunes. It’s a good idea to do it once each month.
If you’re someone who takes lots of photos, you might want to do it every week or every other week. With an iTunes backup, everything on your phone will sync to your computer.
You can also use an online storage app to automatically sync and share your photos and videos. These apps usually won’t save text messages or app data, but they can be set up for automatic syncing as opposed to manual syncing with iTunes.
Backup Your Computer to the Cloud:
There’s no point in backing up your phone to your computer if your computer isn’t also backed up.
Whether you use Google Drive, Dropbox, or some other storage service, this is the best way to ensure that all your data is all safe and secure in one location.
Think about how lost you would be without your photos, apps, videos, app data, contacts, and files. Don’t run the risk of losing everything that’s important to you because you never took the time to backup your phone.
Make use of your free iCloud storage or upgrade your plan to include more. Your backups will run automatically and all your data will be in one place. If you want free storage, backup your phone to iTunes on your computer, then back your computer up to the cloud.
No one cares about your data but you – so it’s completely up to you how you want to do it. Whichever method you choose, start now.
Make it a routine and stick with it. Backing up your devices is one habit you never want to break.