Disclaimer: This post may contain affiliate links, meaning we get a small commission if you make a purchase through our links, at no cost to you. For more information, please visit our Disclaimer Page.
Whether you need to duplicate or extend your laptop display to an external monitor for a better experience, there’s a way to do so. However, by default, laptops will make the screen go to sleep once closed, which will turn off any external monitors connected to the computer. So how do we stop this from happening?
For Windows, head over to the settings > system > power/sleep options > and select the ‘additional power settings.’ tap on ‘what closing the lid does,’ and save. In macOS, tap on system preferences, select the ‘energy saver’ option, and then slide the ‘display sleep’ options to ‘never’.

In today’s article, I’ll cover ways to stop your laptop from going to sleep using a simple setting when connected to an external monitor and offer a step-by-step guideline on how to join the said monitor to the computer.
Whether your machine runs on the latest macOS or a Windows 7/8/10, this article has outlined all the necessary steps to achieving the results.
Table of Contents
How Can I Close My Laptop And Keep My Monitor On?
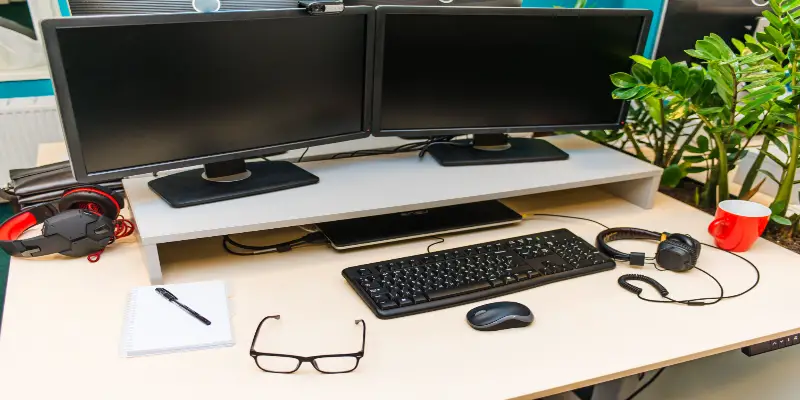
Once you’ve connected the laptop to a monitor, you’ll need to configure it and make it never go to sleep. The process is pretty simple and straightforward, which can be achieved through the following steps.
Step1: Launch Settings
Tap on the icon at the bottom-left of your screen and click on the geared icon named ‘settings’ for laptops running Windows operating systems.
Alternatively, you could type the word settings at the bottom of your screen for Windows 7/10 or hover your mouse to the right side of the screen on a laptop running Windows 8 and tap on the ‘settings’ results shown.
On a laptop running macOS, click on the ‘system preferences’ at the top apple menu. Once tapped, you should see an ‘energy saver’ option displayed on your screen. Tap on the selection as well.
Step2: Connect Your Laptop To The Monitor
After locating the setting that will enable you to stop the laptop from going to sleep, you will need to connect the machine to a monitor.
Depending on the monitor and the laptop, get a connector such as an HDMI cable or a VGA cable if it lacks HDMI support or vice versa. Nevertheless, you can connect the computer to the monitor by either using one of the following options;
- Connect using a VGA cable (most old machines should come with these ports)
- Connect using an HDMI cable
- Connect using the DVI port (most old monitors only have this option)
- Connect using USB c/ thunderbolt three video output
- Get an adapter to convert your laptops video output to the monitor (e.g., HDMI to VGA cable)
Once you’ve picked the best option to connect your computer to the monitor, connect the wires to the two. After a successful connection, you should be able to extend your laptop’s display to the monitor, duplicate the images, or only show them on screen 1 or 2.
By default, Windows will duplicate your computer’s display to the monitor, and so, if you only need the layout to be on the monitor alone, pick the only show on ‘screen 2’, which is the monitor.
Step2: Configure Your Laptop’s Sleep Options
It’s time to configure your settings now that you’ve located where and how to access them.
On a Windows laptop, tap on the ‘system,’ then head over to the ‘power & sleep’ options by tapping on the selection as well. Now click on the ‘additional power settings’ from the menu displayed on the right side of your screen.
You should see an option named ‘what closing the lid does’ from the left side of the selected option. Tap on it and change the settings for either both on battery or charger.
Pick the ‘do nothing’ option from the dropdown list for either of the selections. However, it’s not advisable to change the setting for the battery option because your laptop will still be running even once you are done with the tasks at hand and place it in your backpack.
The laptop might get too hot in the bag and spoil in the process by frying the components. Chances are when using a monitor for the computer, you are near a power source. Hence a better idea to only tickle the option when plugged in.
On a laptop running Apple macOS, you should be able to see an option named computer sleep/display sleep, of which you’ll slide the available slider to ‘never,’ and this should stop the laptop from ever going to sleep.
How Do I Use 2 Monitors When My Laptop Is Closed?
At this point, you should be able to connect the laptop to a single monitor and make it not go to sleep? But what about two monitors?
Is there a way to achieve this? Well, there is a way, as I’ll be discussing shortly through this article.
Extending your laptop’s display to a second monitor will show a different thing from the computer while duplicating the display should exhibit similar information to the computer.
However, in the case of using two monitors, if you want each monitor to display its own thing, then you’ll need to connect them to different display ports on the laptop.
Some scenarios where different monitors might be essential include;
- Programmers who need to compile their programs in real-time while still messing with the code
- Gamers who want to extend the gaming world for better vision
- People working on one thing such as an email while reading a webpage
- People who want to see a movie/video on one screen while surfing on the other monitor
- Forex/stock traders looking up information on one screen while monitoring their trades on the other screen
The list is endless and will come in handy, depending on your needs.
Therefore, to connect your monitor to the laptop, you’ll either need;
- The computer and the two monitors
- A VGA cable (most old machines should come with these ports)
- An HDMI cable
- USB C/ Thunderbolt 3 cable
- An adapter to convert your laptops video output to the monitor (e.g., HDMI to VGA cable)
Hooking up the monitors to the laptop should be pretty easy and straightforward. Just connect them using one of the cables above. If you are showing different things on the monitors, you’ll need two separate connectors.
For the first monitor, you could use a VGA cable and an HDMI cable for the second one since most laptops will come bundled with both the video outputs. Just plug the cable and select what to display on what screen and which display should be off.
In case you want both monitors to display the same thing, you could use an adapter such as an HDMI/VGA splitter which will, in turn, convert the video output from your laptop into two to display on both monitors.
Plugging the cables should take you less time, while configuring the display is where the hustle is for many. Therefore, I want to show you what settings you need to configure once you’ve connected the two displays to your laptop running Windows 7/8/10 or the latest macOS.
Windows 7
As stated earlier in this article, Windows will automatically duplicate the displays once you plug in the appropriate video output cable linking the two.
In Windows 7, while at the home desktop, right-click on the space and tap the ‘screen resolution’ option and then tap on the ‘identify’ button.
At the bottom of the page, tap on the ‘multiple displays’ option and pick the ‘extend these displays’ option if you’ll be displaying different things on different monitors. Once you’ve selected the choice, you should notice the monitors light up with other setups on the screens.
However, keep in mind that Windows 7 doe not come with a multi-monitor taskbar built-in. Therefore, your second or third monitor won’t have a taskbar unless you use third-party utilities as Dual Monitor Taskbar.
Windows 8
To configure the displays in Windows 8, you can quickly press Windows+p on the keyboard.
You should see a sidebar on the right side of your screen with different options, such as extending or duplicating the display. Alternatively, go to Settings > System > Display and tap on the identity button to see which screen is marked with which number.
Now click on each display from the settings and apply any settings to it by saving your configurations.
Scroll down to the ‘multiple displays’ option and pick an option that describes how you want the screens to appear. If your monitor supports the wireless display option, tap on it and link the two via the network.
In most cases, the taskbar will come activated on all displays, unlike in Windows 7, where a third-party utility is required. Nevertheless, if the option does not come automatically on your Windows 8 laptop, go to Settings > Personalization> Taskbar and then enable the ‘show taskbar on all displays’ option.
Windows 10
To configure the displays in Windows 10, you can quickly press Windows+p on the keyboard.
You should see a sidebar on the right side of your screen with different options, such as extending or duplicating the display. Alternatively, go to Settings > System > Display and tap on the identity button to see which screen is marked with which number.
Now click on each display from the settings and apply any settings to it by saving your configurations.
Scroll down to the ‘multiple displays’ option and pick an option that describes how you want the presentations to appear. If your monitor supports the wireless display option, tap on it and link the two via the network.
In most cases, the taskbar will come activated on all displays, unlike in Windows 7, where a third-party utility is required. Nevertheless, if the option does not come automatically on your Windows 10 laptop, go to Settings > Personalization> Taskbar and then enable the ‘show taskbar on all displays’ option.
macOS BigSur
On your mac, tap on the Apple menu and head to the System preferences> Display> Arrangement. Set the displays to a similar resolution and tap on the ‘mirror displays’ option to show the entire desktop on all the monitors.
Alternatively, press the options key and drag one display to the other to mirror it.
Conclusion
In conclusion, setting up multiple displays for your laptop is a fulfilling experience that’s easily approachable by following these guidelines to the latter. By now, you should be able to connect your monitors to a laptop without ever worrying it might go to sleep in the middle of that presentation.