Disclaimer: This post may contain affiliate links, meaning we get a small commission if you make a purchase through our links, at no cost to you. For more information, please visit our Disclaimer Page.
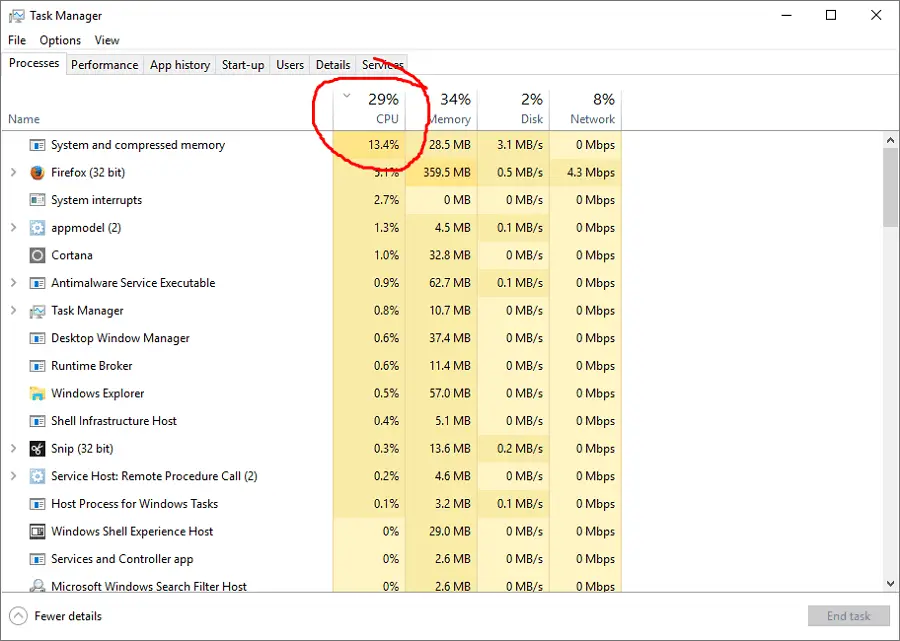
What is the System and Compressed Memory process? Why is it running on your Windows 10 computer? Why is it using a lot of my CPU resources?
Typically, the System and Compressed Memory process only uses a small number of your computer resources, including CPU, RAM, and Disk.
However, if it uses too much CPU, RAM, or Disk resource, then you’ll need to diagnose and find the cause of that high computer resource usage problem.
In some cases, the System and Compressed memory process can use 100% of your CPU, or RAM, and make your computer run incredibly slow, or even crash. That is the reason why you must find out the cause and resolve it as soon as possible.
What is System and Compressed Memory and How Does It Work?
In previous generations of Windows OS (operating system), when your computer is running out of physical RAM, Windows will use the pagefile.sys to store unused pages. This file is often located at C:\pagefile.sys and acts as extra memory, which is used to keep pages that don’t use at the time your RAM becomes full.
When your RAM has more free space again, Windows will load back stored pages in the pagefile.sys file to use. This function will help your computer still run smoothly in case of deficiencies in RAM.
However, in Windows 10, instead of storing unused pages to the pagefile.sys file as usual, Windows will compress those pages. The purpose is to make them lighter and continue to keep them in the physical RAM memory. It will help to reduce the memory used per process and allow Windows 10 to run more programs in physical memory at a time. A quick explanation can be found in this article, from Microsoft’s blog.
Also Read: How To Fix MsMpEng.exe High CPU Usage Problem?
This service is only available in Windows 10, named “System and Compressed Memory Service“. Microsoft creates it to improve the overall performance. Of course, Windows still uses pagefile.sys in case your computer doesn’t have much RAM left, and it can’t compress pages anymore.
In this article, I will show you a few useful methods that you can use to resolve the System and Compressed Memory high CPU usage problem on your Windows 10 PC.
Fix System and Compressed Memory High CPU Usage Problems in Windows 10
Note: The System and Compressed Memory process can cause high CPU, RAM, or Disk usage problem. I would recommend that you try all solutions below, one by one until you fix it.
Set The pagefile.sys File Size Back to Automatic
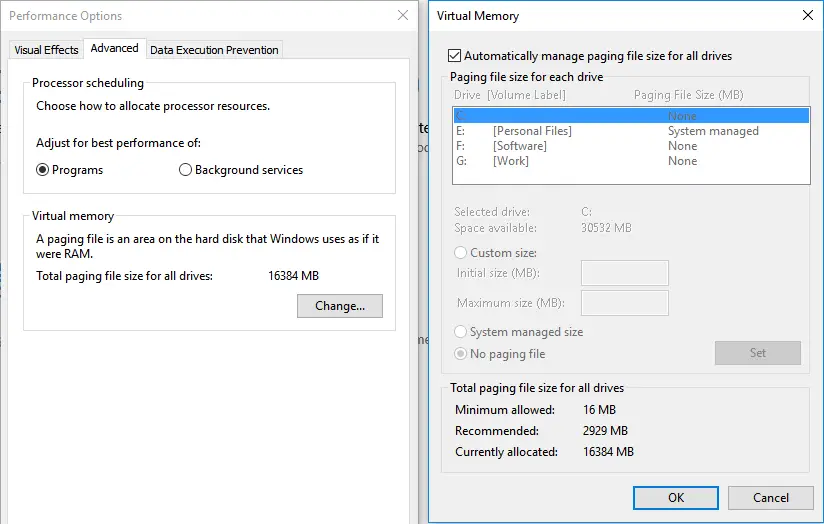
By default, Windows will set the pagefile.sys file size and manage it automatically. You can also adjust it to a particular value as you want. However, doing that can lead to a few issues with memory compression, or sometimes causing 100% disk usage problem in Windows 10.
If you recently changed the “pagefile.sys” file size, restoring it back to the default setting will help you solve this problem. To do so, follow the instructions below:
- Press Windows and then choose Settings.
- In the Settings window, search for “Performance” and then choose “Adjust the appearance and performance of Windows“.
- Go to the Advanced tab and click the “Change…” button, in the Virtual Memory section.
- In the Virtual Memory window, check the “Automatically manage paging file size for all drives” box.
- Click “OK” button twice and then restart your computer.
Stop or Disable Superfetch
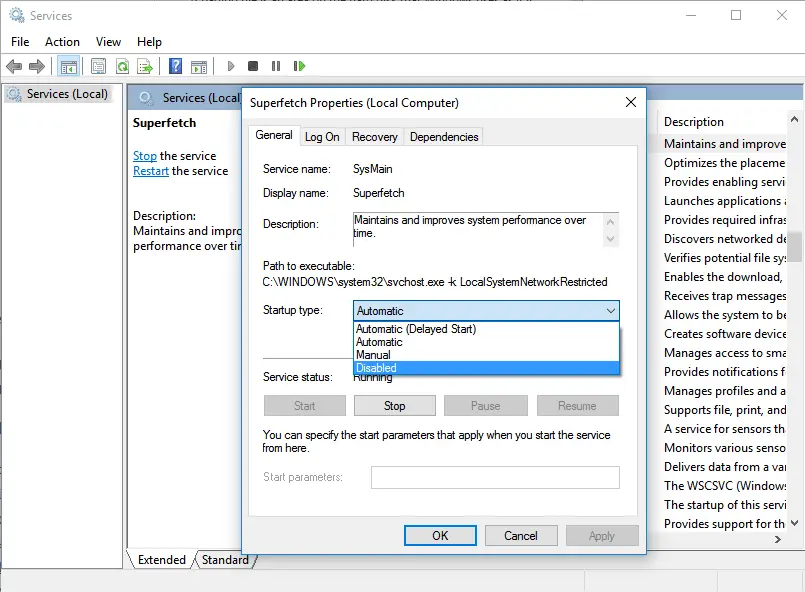
What is Superfetch? It’s a Windows service that is used to maintain & improve your Windows system performance. However, Superfetch sometimes can cause the System and Compressed Memory process 100% disk usage issue.
Also Read: Fix Svchost.exe (netsvcs) High CPU Usage or Memory Leak Issues.
To fix it, you need to stop the Superfetch service, or even disable it. To do so, follow the instructions below:
- Press Windows + R to launch the Run dialog box.
- Type “services.msc” without the quotes and press Enter.
- In the Services window, search for the Superfetch service.
- Double-click on it and choose “Stop“.
- In the “Startup type” drop-down list, select “Disabled“, then press “Apply” button and then “OK” button.
- Restart your Windows PC.
Optimize Windows’ Visual Effects for Best Performance
According to some answers from the Microsoft forum, many users have resolved the System and Compressed Memory high CPU usage problem by optimizing Windows’ visual effects for best performance.
To do so, follow the instructions below:
- Right-click on “This PC” and choose “Properties“.
- Select “Advanced system settings” from the left panel.
- Click on the “Settings…” button in the Performance section.
- Select “Adjust for best performance” option, and click on “Apply” and then “OK” button.
- Click on “Apply” and then “OK” button again in the System Properties window.
- Restart your computer and check whether the problem remains.
Besides the methods above, I would also recommend you to use Reimage Plus to scan your Windows computer, detect corrupted files and fix them if there is any.
You also can try to disable Hibernate, Fast Startup and “Show me tips about Windows” to resolve the System and Compressed Memory high CPU, RAM, or Disk usage problem.
If you have any questions regarding this guide or the System and Compressed Memory process, let me know by leaving your comment below.


