Disclaimer: This post may contain affiliate links, meaning we get a small commission if you make a purchase through our links, at no cost to you. For more information, please visit our Disclaimer Page.
Getting a cable connection error sign could stop you from getting work done or enjoying your Acer monitor. This error usually occurs because of a port issue, faulty cable, monitor settings, or hardware problem.
We’ve put together seven of the best fixes to get your connection back on course.
Table of Contents
4 Potential Acer Monitor Connection Issues
If your Acer monitor is flashing the “Cable not connected” error message, you have a few things to check out. First, we’ll inspect the cable and ensure it is securely connected. Next, we’ll check out the monitor and its settings. Finally, we’ll consider possible hardware issues.
1. Incorrect Cable
Just because it fits in the port doesn’t mean it’s the right cable for the job. You may be using the wrong cable or have the incorrect input selected for your cable on your monitor. The cable may also be twisted, damaged, frayed, or broken.
2. Wrong Port
Both input and output ports connect your monitor to the video and sound source. You’ll need to inspect to ensure no port issues affect your monitor’s display. A broken port must be fixed professionally before this error message goes away.
3. Monitor Issue
The monitor itself could be the issue with the connection if there’s a hardware problem.
4. Settings Issue
Settings within the monitor could be adjusted to try and connect your display correctly. If you’ve added a discrete card to your PC, you’ll also have to configure the settings so that your monitor displays an image from this source.
7 Probable Fixes for Acer Cable connection problems
Here are the top fixes to recognize a cable connection on your Acer monitor.
1. Check the Cable
First, check the cable you use for any bends, frays, cuts, or other damage. If the cable is in good condition, identify what kind of cable it is by its ends.
Monitors usually connect to their source using VGA, DisplayPort, DVI, HDMI, or USB Type-C connections. The cable you use depends on your device and what you want to use it for.
HDMI is usually the go-to between TVs and computers, as it offers a clear picture and connection and is widely supported. DisplayPort is another popular option just for PCs that can drive multiple monitors from one connection.
If possible, VGA is an older cable that should be avoided, and DVI is for video only. USB Type-C cables are the newest option that work great for laptops and phones.
You can find pictures of the ends of these cables online to identify which cable you’re using. Make sure your monitor supports it and plug the cable in snuggly on both ends.
2. Reset Your Monitor
Your monitor may not register a cable connection because it didn’t boot up properly or is having a problem with its signal. Once your cables are confirmed, let’s reset your monitor.
Disconnect all of the cables that are plugged into your monitor except for the power source. Hold down the power button on the monitor for a full 30 seconds. Wait at least five minutes – perhaps enjoy a snack in the meantime – and then plug everything back in and turn on the monitor. It may take a few minutes for the display to load.
3. Adjust the Settings
All PCs have one of two types of graphics cards. They could be integrated or discrete. One integrated card comes by default with every system. Discrete cards are added later. If you’ve added a discrete card, you may not have adjusted your settings to show it.
If you have plugged your video cable into the discrete graphics slot, you will receive this error message. You can adjust this by configuring your display via the Basic Input/Output System (BIOS) settings.
Depending on your version of Windows, you’ll enter BIOS through different keys or settings. You can search “[Your Windows version] how to enter BIOS” online and find guidelines for your computer.
Once you’re on BIOS, you can select “Discrete” instead of “Auto IGFX.” The graphics on the monitor should then register from your discrete card.
4. Seat the Graphics Card
“Seating” your graphics card just means fitting it the right way into your PC. This usually happens incorrectly when someone sets up or mounts a PC on their own. Make sure the graphics card is pushed in all the way.
5. Switch Between Cable Sources
If you have been using a cable connection, have selected the connection on your monitor, and can’t connect with the display, try using another cable source we mentioned in fix #1. If you have a DisplayPort, HDMI cable, or DVI cable lying around, plug it into the respective ports, disconnect the original cable, and see if your monitor registers the image.
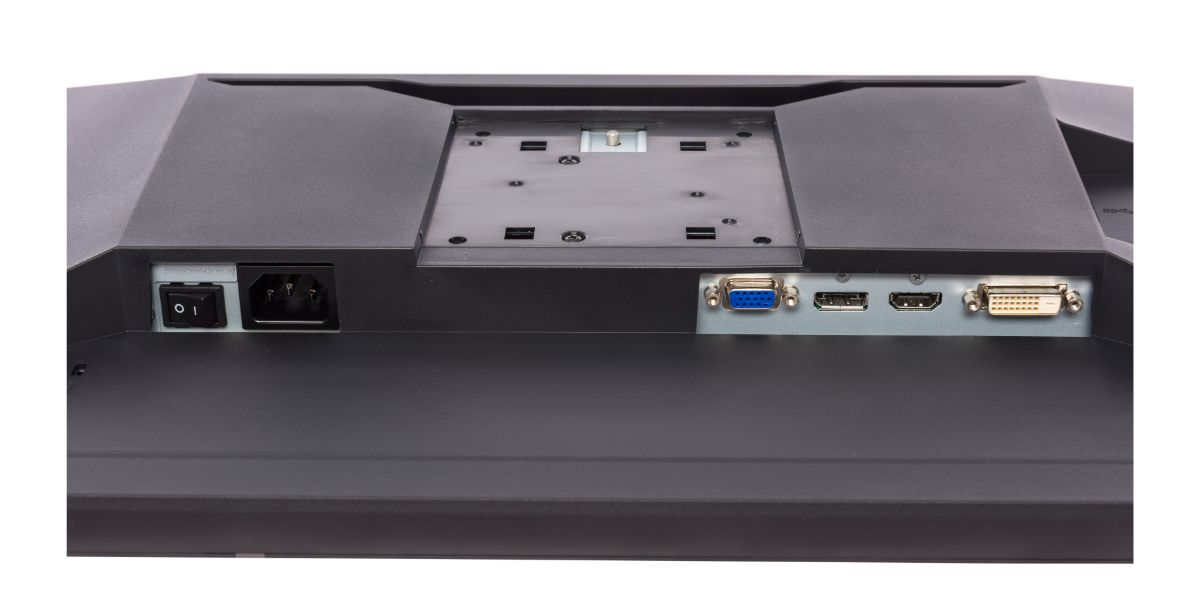
6. Check the Ports
There are output ports that come from your primary device (usually the computer tower or laptop) and input ports on your monitor. If one of these is broken, the connection will not work.
Inspect the ports with a flashlight to look for any apparent damage. This could happen if your device was transported, fell, or hit something unexpectedly.
If you notice damage in the ports, you’ll have to head to fix #7.
7. Consider Professional Assistance
If you believe your monitor or device has visible damage or a hardware problem that you can’t find, it may be time to take it to a tech repair shop. Unless you’re experienced with tech repair, it’s best not to poke or prod around the inside of your monitor or device to avoid further damage.
Find a location near you for tech repair via Google maps, use any warranties that came with your monitor or device, and always choose professional services with positive customer reviews.
Final Thoughts
Your Acer monitor may not recognize a cable connection because of a cable, port, monitor, setting, or hardware issue. Some of the best fixes start with inspecting your cable, ensuring it is supported and selected on the monitor, adjusting monitor settings, and inspecting the ports and devices for damage.
If you still can’t resolve the issue and think it might be internal, head to your local repair shop to get a quote and fix it.