Disclaimer: This post may contain affiliate links, meaning we get a small commission if you make a purchase through our links, at no cost to you. For more information, please visit our Disclaimer Page.
Apple AirTags are unique little devices for helping you find your stuff without spending an arm and a leg on some newfangled device that never does what it’s supposed to do. Unfortunately, AirTags are fantastic devices, they’re also new, which means the occasional quirk is bound to pop up.
There are a number of things that can cause an AirTag to go off and it may even seem like it’s doing it at random. However, it’s usually because of something the device is actively doing, something you’re doing, or something in the middle, like that “quirk” we mentioned.
Table of Contents
AirTag Randomly Goes off: 5 Causes & Fixes
Like any 1st gen product, you should expect a stumbling block every now and then. But, the good news is, AirTags are fairly simple devices. A lot simpler than your iPhone that is. There are several ways to fix these little hiccups and make your AirTag work like it’s supposed to.
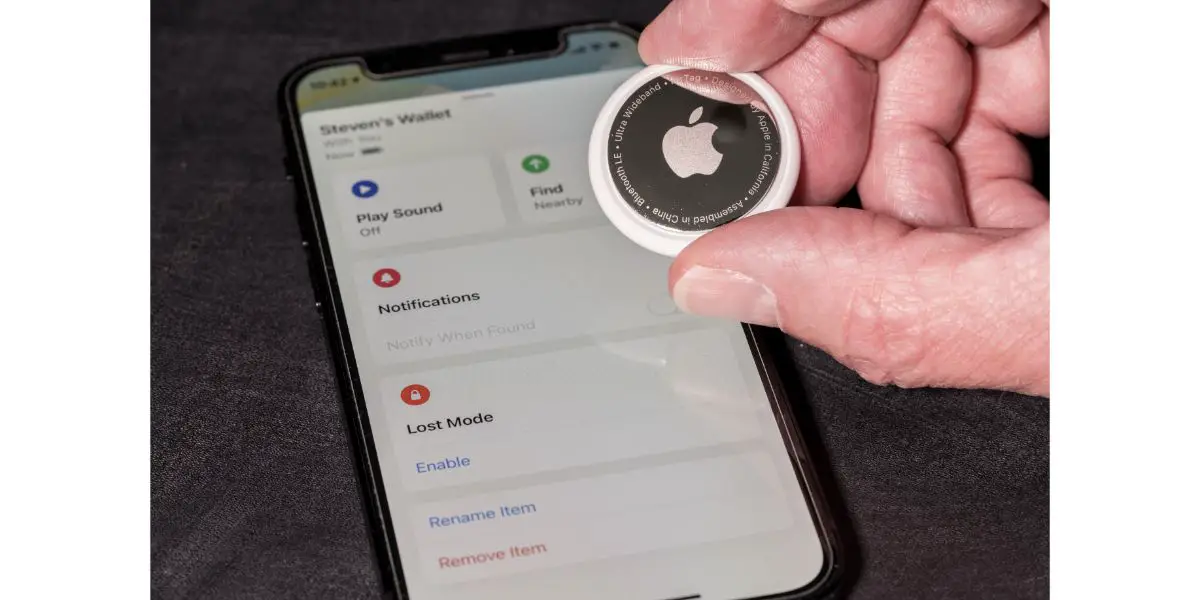
1. Accidentally Turned on Lost Mode
We’ve all been there. You’re sitting in a restaurant, enjoying a meal when your backside starts talking to you. No, your behind didn’t suddenly grow a voice. You just accidentally dialed someone. Since your iPhone is required to operate an AirTag, it’s entirely possible you activated “lost mode” with your haunches.
- Open your “Find My” app
- Select your AirTag
- Swipe up (if necessary) and locate Lost Mode
- Turn off Lost Mode
In the same way, you accidentally turned on Lost Mode, you can also turn on “Play Sound,” which activates a sound on the device you selected. It’s another feature in the Find My app that might make your AirTag go off. You turn it off on the same screen you use to disable Lost Mode.
2. Connection Issues
This is one of those “1st generation” device issues we mentioned above. The problem with 1st gen devices is that they usually have hiccups and connection strength is often one of them.
All it takes is a brief moment of connection interruption and your AirTag’s brain is suddenly scrambled.
Most of the time, it’s simply not sophisticated enough to fix itself. You’ll have to do the fixing by removing the AirTag and adding it back as a New Device. You can do all of this from the Find My app as well.
Go back to the Find My app and select your AirTag. Select Disconnect and go ahead and add the device back again. It will act as if you just added a new Apple AirTag for the first time. This will solve the problem 99.9% of the time.
3. Just Reset Your AirTag
Sometimes, we’re just not meant to know why our devices are malfunctioning. Not all of us can be computer engineers after all. Plus, most people don’t walk around with anti-static gloves, microprocessors, and soldering kits in their pockets.
The good news is if you don’t know why your AirTag is beeping at you and you can’t get it to stop, a simple reset will do the trick. No Masters Degree is necessary.
- Depress the AirTag Cover and rotate it (counter-clockwise—like removing a soda lid)
- Set the cover aside
- Remove the battery
- Put the battery back in
- Remove it three more times, carefully putting the battery back in each time
- The AirTag will throw one last beep your way when the reset is complete
- Replace the cover
- Connect your AirTag device all over again, as if you just unboxed it for the first time
Sounds like a pain but it is what it is. Here’s to hoping future Apple AirTags are far more convenient when it comes to resets and the like.
4. Keep Your AirTag Updated
This seems like a no-brainer but we all get busy throughout our lives and many of us just assume that our devices are quite capable of updating themselves. Usually, they are but not always.
Most of the time, the Apple AirTag fails to update because it’s not close enough to your iPhone.
Since the AirTag only operates through a wireless, Bluetooth connection to your phone, it won’t update on its own just because it’s located within the sphere of your home’s WiFi.
There are two things you need to check here. Well, actually there are three if you include the fact that your iPhone needs to be charged and not on its last legs battery-wise.
Make sure your Apple AirTag is close enough to your iPhone that it can receive an update from the phone.
Ensure that it’s connected via Bluetooth, despite the fact that you walked out of range, even if it was only for a second or two.
Sometimes, the device won’t automatically reconnect when you’re back in range and you have to connect it manually by going into Settings.
Remember, Bluetooth and WiFi share the same weakness. They have trouble passing through a lot of metal, brick, concrete, grout, and thick wood. You can be within five feet of your AirTag and if there is an exterior wall between you, it might disconnect.
5. Turn Off the Security Alerts
There might not be a cause. At least no cause that you can figure out without taking the device down to an Apple store or a third-party repair shop.
While turning off the alerts is normally unadvisable, you can still track and locate your AirTag through the Find My app. You only need the sound to alert you when you’re getting close to the device and need to know its precise location.
- Jump back on the Find My app
- Look in the bottom, right-hand corner and find the “Me” tab
- Locate the toggle button for “Item Safety Alerts”
- Toggle it off
- Select “Disable” when the confirmation bubble pops up
That’s it. Now, if you need the noise again, you can always track down the AirTag using the Find My GPS feature. Once you get close to it, simply reverse the entire process and toggle the “Item Safety Alerts” back on.
Bottom Line
Typical causes are simple and boil down to connection issues, firmware updates, resets, or the device being stuck in Lost Mode. On the bright side, the fixes are usually pretty simple.
Sometimes, there might not be a discernible cause and you can turn off the alerts until you get to a repair facility or send it to Apple.