Disclaimer: This post may contain affiliate links, meaning we get a small commission if you make a purchase through our links, at no cost to you. For more information, please visit our Disclaimer Page.
What do you do when you need to add a watermark to images? Find image editing programs that are capable of helping you to add a watermark to images?
Adding a watermark with your name or website name to your pictures will help you to prevent others from copying it. There are many image editing apps available on the Internet now, which can help you to do so.
I’ve tried a few free and premium apps that helped me to add a watermark to my images. You can easily find them by searching for “free photo watermark software” on Google.com. Each of them has its own pros and cons. However, if you don’t often add watermark to pictures, I have a simpler solution for you. Why not use Microsoft PowerPoint?
Did you know that Microsoft PowerPoint can help you to add a watermark to pictures? Most people only use this program to make presentations. However, you can also use it to edit your images, add a watermark, create blur effects and much more.
Insert A Watermark To Images Using Microsoft PowerPoint
In this article, I’m going to show you how to add a watermark to your images using the PowerPoint. So let’s get started.
Typically, adding a watermark to an image using PowerPoint includes three steps:
- Choosing and adding the text that you want to use as a watermark.
- Formatting and making it transparent.
- Grouping and exporting the image.
If you want to add a watermark to some pictures, you don’t need to repeat all the steps above. Instead, you only need to set up the watermark for the first image. For other pictures, it’s easy to reuse the same watermark that you created for the first image.
All you need to do is:
- Ungroup the watermark.
- Change the image.
- Group and export the new image.
Steps To Add A Watermark To Images Using PowerPoint
Step #1: Navigate to File -> New and choose “Blank Presentation” to open a new and blank PowerPoint file. You can also do the same thing by pressing Ctrl + N.

Step #2: Choose the “Insert” tab and click on “Picture” to add the image you want to add the watermark to. Next, browse for the image and insert it into the PowerPoint file.

Step #3: From the “Insert” tab, click on “WordArt” and then choose the text style for the watermark.

Step #4: Click on the watermark frame and enter whatever you want to use as your watermark.

Step #5: Click on the WordArt border to choose it. Then resize or drag it to the position where you want to add it to the picture.
Step #6: Click the watermark to choose it and then click on the “WordArt Styles“, as shown below. Located in the “Drawing Tools” tab.

Step #7: In the “Text Fill” section, choose “Solid Fill“, pick the color for your watermark and then set the “Transparency” value to 80%.
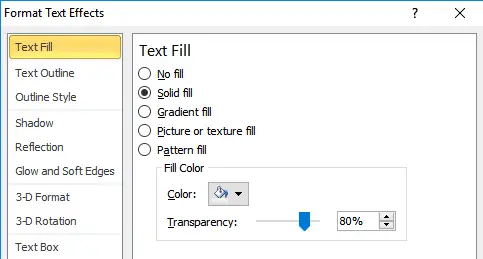
Step #8: In the “Text Outline” section, select the color, and then set “Transparency” value to 75%. If you want to add other effects, such as a shadow, just add it.

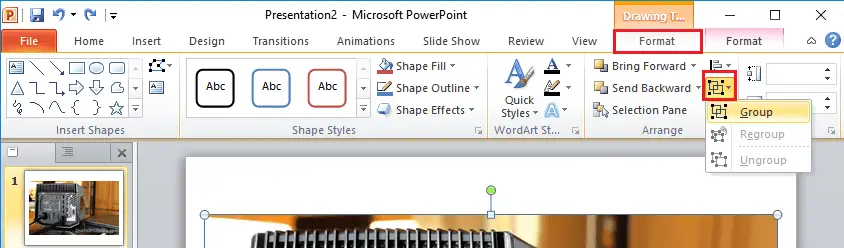
Step #9: Press Ctrl + A to choose both the picture and the WordArt (your watermark).
Step #10: Navigate to the “Picture Tools” tab, click on “Group” from the “Arrange” group, as shown below. Next, choose “Group” to group both the picture and the watermark.
Step #11: You can now save the object as an image by right clicking on it and then choose “Save as Picture“. Select the location where you want to store it, enter a new name for it, and then click “Save“.

So you have successfully added a watermark to your image to protect it from someone who wants to copy it.
What about adding the same watermark to other images?
Insert A Watermark To Multiple Images Using PowerPoint
When I say “multiple”, I mean adding the same watermark that you have created and formatting it to other images, one by one. It doesn’t mean add watermark to multiple images at once. In order to do this, you have to find another software.
So, if you want to add a watermark to other images, as I explained above, follow these instructions:
Step #1: From step #11 above, press Ctrl + A, navigate to the “Picture Tools” tab. Next, click on the “Group” icon and choose “Ungroup“.

Step #2: Choose only the picture and then press “Delete” to remove it from the PowerPoint file. The image will be deleted, but the watermark still remains in its current position.
Step #3: Navigate to the “Insert” tab. From the “Images” group, click on “Picture” to add another picture.
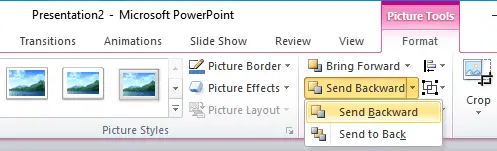
Note: If you don’t see the watermark after adding the new image, go to “Picture Tools” tab, choose “Send Backward” from the “Arrange” group.
Step #4: Repeat step #9, #10 and #11 above to group, export your new image, with the watermark.
Here is the result after adding watermark to picture using Microsoft PowerPoint. What do you think? How good is it?
https://whatsabyte.com/wp-content/uploads/add-watermark-with-powerpoint-min.png
Have something you want to add to this article? Let me know by leaving your comment below.