Disclaimer: This post may contain affiliate links, meaning we get a small commission if you make a purchase through our links, at no cost to you. For more information, please visit our Disclaimer Page.
Have you ever wondered what is CompatTelRunner.exe when looking at it in Windows Task Manager?
CompatTelRunner.exe is a Windows system process that is used to update the operating system to the latest version or also known as the updates for Windows. It is also used to upgrade other types of Windows, such as Service Pack updates.
In addition, the CompatTelRunner.exe system process is also used to run all the Windows diagnostics to help find the compatibility problems on your computer. It also helps to collect necessary information when the Microsoft CEIP (Customer Experience Improvement Program) is enabled. Based on the gathered information and CompatTelRunner.exe application, Microsoft can determine whether your computer is compatible or not whenever you want to download and install new Windows updates.
This system process is part of Windows Update, and sometimes it can take up a lot of your computer resources, especially CPU and Disk Usage. I have received many reports from users who complained that they found multiple CompatTelRunner.exe processes appearing in Windows Task Manager which were consuming more than 60% of the CPU or Disk Usage resource.
In fact, this process isn’t essential and can be terminated from running on your Windows computer. However, if you want Microsoft to diagnose and check compatibilities, you need to keep it running, despite the fact that it could be a serious privacy concern to some users.
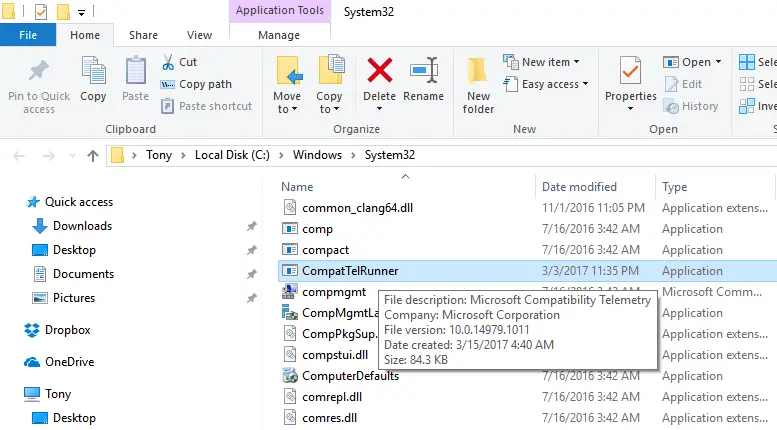
Stored at C:\Windows\System32 folder, the CompatTelRunner.exe file is owned by TrustedInstaller. Therefore, you won’t be able to modify this file in any way, even delete it. There would be an error with the “Access is denied” message when you try to do so. In fact, you will get this type of error when trying to modify all the system files that are owned by TrustedInstaller.
However, you can remove that file out of your Windows computer by taking ownership of it. But doing so, your Windows can confront a few issues, especially the Windows Update feature. Therefore, you can prevent it from running by disabling the Microsoft Compatibility Appraiser in the Task Scheduler instead of removing the CompatTelRunner.exe system file.
Table of Contents
How To Fix CompatTelRunner.exe High CPU And Disk Usage
Before using any solution below, I would recommend rebooting your computer first. Sometimes, a simple reboot will help to resolve most of the annoying issues you may encounter in Windows 10. After restarting, if the problem persists, then try the methods above to fix this type of high computer resource usage issue.
[full-related slug1=”svchost-exe-netsvcs-high-cpu” slug2=”wmiprvse-exe-wmi-provider-host-high-cpu-issue”]1. Scan And Repair Corrupted Windows System Files
Typically, the CompatTelRunner.exe process doesn’t take much of your computer resources. However, when something goes wrong with your computer, such as corrupted or missing system files, then it can lead to some serious issues, including this one.
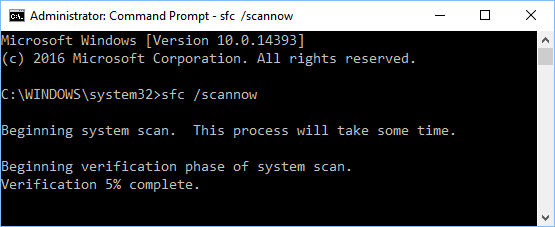
To resolve it, you can execute the SFC command to scan for corrupted or missing files, and repair or replace them if necessary. To do so, press Windows + X, select Command Prompt (Admin) from the context menu and choose Yes to open it.
In the Command Prompt window, execute the following command to start scanning and repairing/replacing corrupted/missing Windows system files.
sfc /scannow
This process may take minutes or even an hour to complete. Please wait for the process to complete and then reboot your Windows PC.
This method can help you to fix the high CPU and Disk Usage issue that was caused by CompatTelRunner.exe. Otherwise, try other methods below.
2. Prevent CompatTelTunner.exe From Running In Windows
As I mentioned above, instead of removing the CompatTelTunner.exe system file out of your computer, you can prevent it from running by disabling the Microsoft Compatibility Appraiser in Task Scheduler.
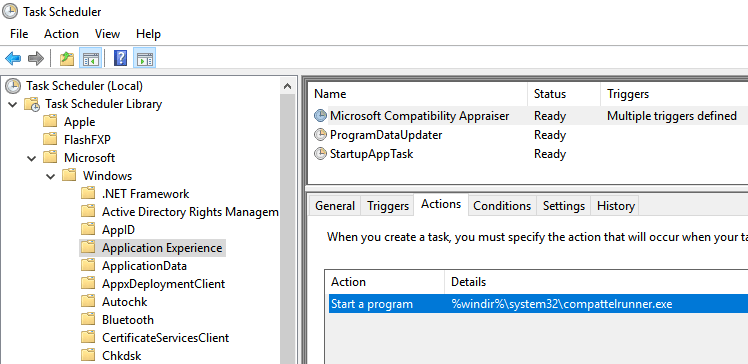
To do so, press the Windows key and then search for Task Scheduler. Then click it from the search result to open Task Scheduler.
In the next step, navigate to the following address below:
Task Scheduler Library >> Microsoft >> Windows >> Application Experience
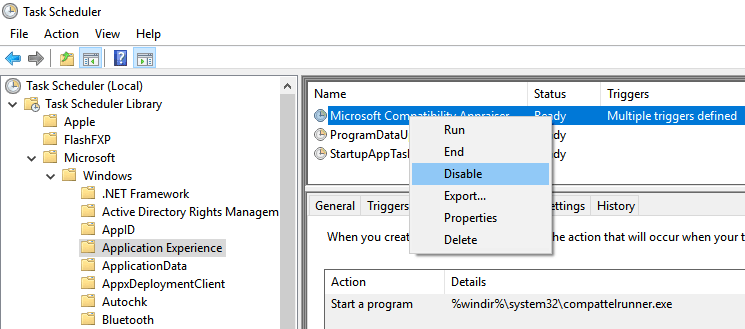
There would be three tasks on the list. You need to choose “Microsoft Compatibility Appraiser“, right-click on it and select the “Disable” option.
After that, reboot your Windows computer to test if the issue persists or not.
In case the high usage issue caused by CompatTelRunner.exe remains, you should also disable “ProgramDataUpdater” as sometimes it can call the CompatTelRunner.exe to run.
3. Remove CompatTelRunner.exe File Out Of Your Windows Computer
Like I said above, removing this system file can create some problems on your computer. However, if you still want to delete it, here is how you can take the ownership of it and remove it out of your computer to get rid of the high CPU & Disk Usage issue that was created by CompatTelRunner.exe.
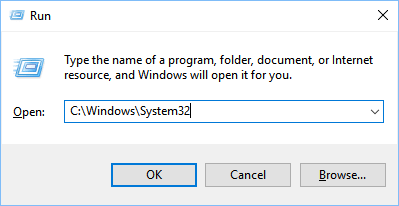
Firstly, press Windows + R, fill in the following address and then press Enter.
C:\Windows\System32
In the next step, search for the CompatTelRunner.exe file and then right-click on it to bring up the context menu.
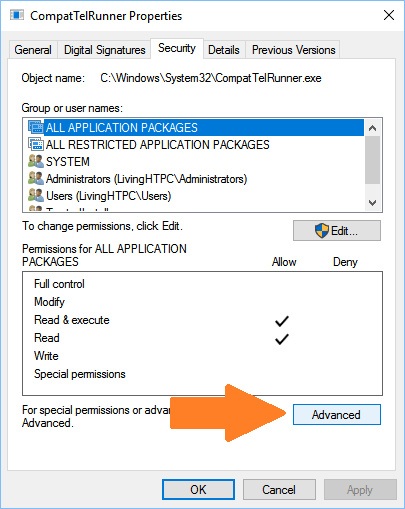
Next, select the Properties option and then switch to the Security tab.
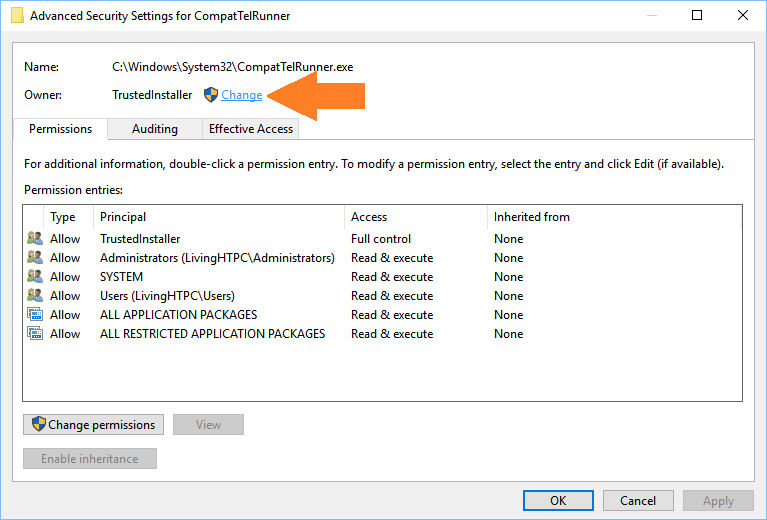
Find the “Advanced” button and click on it to open the Advanced Security Settings window for CompatTelRunner.
In the next step, click on the “Change” link to switch owner from TrustedInstaller to something else.
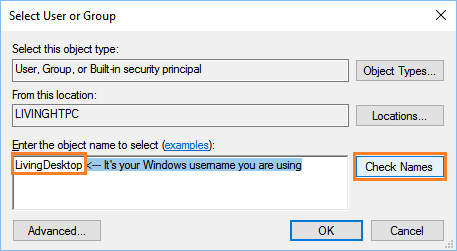
Type the username that you are currently using into the box and then click on the “Check Names” button to verify it’s correct. After that, click on the “OK” button.
After switching the ownership of CompatTelRunner.exe, click on the “Apply” and then “OK” button to save changes.
A prompt will appear to ask you to close all the opened Properties windows in order to adjust the ownership. You just need to close them, and everything will be done.
The next move is to adjust the permissions of the account you are using. To do so, right-click on the CompatTelRunner.exe file, select Properties, switch to the Security tab and then click on the Advanced button again.
In the next step, select the account that you are currently using from the list and double-click on it.
Next, check the Full Control checkbox and click on the “Apply” button.
That’s it!
You can now fully control CompatTelRunner.exe and do whatever you want with this system file, such as delete it, without getting the “Access is denied” error.
After removing the CompatTelRunner.exe system file from your Windows computer, I’m sure you will not confront any high computer resources usage issues that are caused by it anymore.
If you have any questions regarding this article or the CompatTelRunner.exe file, please post your comment below.

