Disclaimer: This post may contain affiliate links, meaning we get a small commission if you make a purchase through our links, at no cost to you. For more information, please visit our Disclaimer Page.
Replacing the thermal paste on your Graphics Processing Unit not only improves the cooling effect on your graphics card but also regulates the temperature range at which your GPU operates. Mainly, this is because the factory thermal paste or compound that comes with a new graphics card is not always reliable. Although it may perform its job for some time, you will start noticing an increase in operating temperature after a while.
Unscrew all screws on the graphics card and scrub off the old thermal paste using a microfiber cloth and isopropyl alcohol. Smear some thermal paste over the chip and refit the graphics card cover. Finally, tighten the screws in a cross-pattern and reinstall the GPU on the motherboard.
Ensure that you use a high-quality thermal paste or TIM to ensure effective heat transfer between the heatsink and the GPU.
Using a long-lasting thermal paste ensures that it doesn’t go hard after a short while. This guide will focus on some reasons you should consider changing the thermal paste on the GPU and how to do it.
Table of Contents
Can You Change The Thermal Paste On Gpu?
Generally, it would be best if you only changed your GPU’s thermal paste when you notice increased temperatures and reduced performance with your device. Otherwise, provided you have the heatsink secured in place, and your thermal paste is of top-notch quality, it should serve you for several years with no replacement.
Although you can change the thermal paste on your GPU as much as you want, it is needless to replace it every year since you’ll only be risking damage to your heatsink.
However, exceptions might occur and it should be worth the effort if the computer has a service life of more than five years, was assembled by a not-so-accurate entity, or if it is a second-hand device.
Also, you can change the paste when you realize the device behaves below predictable standards or when it cools insufficiently.
Also, for normal use, you needn’t have to replace it for the whole life cycle of the device. But for intensive uses such as gaming or when pushing boundaries with overclocking, you may have to replace the paste after about 35 years.
You can easily get away without doing that forever, provided you do not experience any temperature issues.
Also, you don’t have to replace the thermal compound if you are installing a new heatsink on your processor since new HSFs usually come pre-applied from the factory. However, replace it if you are installing an aftermarket cooling system.
Can You Use Any Thermal Paste On Gpu?
The question of whether the thermal compound you use matters remains a subject of debate. Since different thermal pastes have varying prices, cooling effectiveness, composition, and viscosity, ensure that the compound you use is of top quality. Also, the type of cooling compound you use depends on the level of cooling effectiveness you wish to achieve.
If you choose the DIY approach to apply your thermal paste, then you have a wide selection at hand to choose from than if you were to take it to a store and let the professionals perform the task for you.
Typically, there are two variants of thermal paste. Those that do not conduct electricity, and those that do. Paste that conducts electricity usually includes metal components such as Arctic Silver 5, which features microscopic silver bits that help conduct more efficiently.
However, such pastes can easily damage computer components if they accidentally spill on the wrong areas because of their electrical conductivity.
Carbon and ceramic-based pastes cannot conduct electricity and are safer and especially recommended for newbies who are looking forward to changing the thermal paste independently.
Although they are less effective than their metal-based counterpart, this doesn’t affect your PC’s performance unless you are using the computer in hot areas or operating a serious performance machine.
Similarly, to determine the type of paste to use, check at your computer’s build. If it features much closer components, like it is with many laptops, then I recommend you use a non-conductive carbon-based TIM unless you can and rely on your application skills.
Another reason to consider before selecting a higher-efficiency paste instead of a normally performing one is if you haven’t changed your meager air-cooling fan with a more powerful stock cooling system.
There is no need to undergo the hassle and risk of applying metal TIM if your device features a sturdy liquid-cooled heatsink unless you want to set the device for high performance, such as gaming.
Can You Put New Thermal Paste Over Old?
Although adding new paste over the old one rarely causes any harm to the device, it reduces the paste’s inefficiency since multiple layers affect heat conductivity.
Thus, to ensure effective thermal conduction, clean the old paste on the GPU using a microfiber cloth dipped in isopropyl paste.
Although the liquid-metal and other better-quality thermal paste versions offer better conductivity, users tend to experience difficulty when applying and cleaning it up.
Also, since most coolers come with their own thermal paste, you needn’t reapply another layer. Instead, use it directly as it comes, even if you consider it of poor quality.
Is Too Much Thermal Paste Bad?
Applying excess paste on a socket won’t cause any substantial harm to your PC’s thermal performance since mounting pressure will make the extra paste squirt out when tightening the cooler.
Avoid applying insufficient paste at all costs since applying too much thermal compound will still result in the same effect once you tighten down the cooler.
Note that the problem with applying too much thermal paste isn’t with the thermals. Instead, it is the risk of shorting the computer components, especially when using a conductive metal-based compound.
Otherwise, you will just end up with a huge mess when using non-conductive paste.
Also, contrary to popular belief, vigorous testing and research have proved that putting too much paste does not increase your temperatures. Applying too little paste will result in that, however.
Does Replacing The Thermal Paste On GPU Void Warranty?
Replacing the thermal paste does not void your warranty provided you don’t physically tamper with the GPU. You should have no issues with replacing your TIM, just ensure that you do not cause any damage on the PCB and the warranty sticker stays put as well. However, please take caution when spreading the thermal paste to ensure that it covers the die completely.
Failure to cover the dye fully or missing small sections will cause shutdowns, and black portions of the screen since some parts of the GPU will overheat. It is best if you use a star or x technique when spreading the GPU since a dot is likely to cause air bubbles, resulting in the overheating of the GPU even if reports suggest it is running at normal temperatures.
Such instances increase the possibility of voiding your warranty. Also, although some computer models specify that you can void the warranty by removing the sticker on the screw heads, this doesn’t go in line with the American Warranty specifications. Be sure to read through your warranty to check what you can or cannot do.
Is It Worth Replacing GPU Thermal Paste?
Replacing your GPU thermal paste is essential, especially when you get suspicious of an issue with your cooling system, yet the cooling fans still run seamlessly.
It is advisable to change the thermal paste between the heatsink and GPU, especially if your GPU is a little older or has been running for some time.
Most thermal pastes, especially low-quality ones, harden with time, causing the GPU to overheat, which could permanently damage the GPU. It is for this reason you should replace the factory thermal paste with a high-quality one.
Also, replacing the thermal paste on your Graphics Processing Unit is worth the effort, especially in the long run. Typically, the metal surface of the Integrated Heat Spreader and GPU may appear smooth to the naked eye.
However, it will shock you to realize that the metal plates have minute imperfections that minimize efficient heat transfer.
Since the imperfections prevent the two surfaces from going into full contact, reapplying the GPU thermal paste will help fill the air gaps present, which allows for improved heat transfer.
In simple terms, thermal paste enables the heatsink to perform its job in helping cool the GPU. As a result, the GPU’s cooler, the lesser the potential performance issues like throttling, among many others.
Provided you reinstalled the heatsink in the correct position, used a high-quality thermal paste, and followed the correct application procedure when applying the TIM, it should be able to serve you for many years without the need of replacing it again.
Actually, the chances are high that the upgrade will outlive the CPU or GPU before you notice any possible degrading.
Definitely, you needn’t have to replace the thermal paste every year regardless of the brand you are using. You are just risking damaging the heatsink connectors for no reason.
Under normal circumstances, there is no need to disassemble the GPU since it may void the warranty in some models. Otherwise, unless you are experiencing excessive heat, keep your thermal paste safe for later use, probably for the next two or three years since it doesn’t go bad.
How To Change A Thermal Paste On GPU
Before changing your GPU’s thermal paste, keep the following in mind.
Ensure that the GPU is clean by scrubbing off the old thermal paste if present. You can use a microfiber cloth or paper towel that doesn’t shed and allow it to dry before proceeding.
Before applying the TIM, ensure that the rest of the cooler is ready for installation. Follow the instructions and ensure to complete every step when installing the GPU cooler.
To achieve this, make sure that you have all the necessary tools and requirements at hand. Below are the steps to follow when replacing the thermal paste on your GPU.
Remove The Graphics Card From The Computer
Turn off your PC by unplugging from the power source, and disconnect all connected cables. After that, open the case lid and unplug the cables that connect the graphics card.
Use a screwdriver to unfasten all screws that secure the card to the case lid. Slide the release clip (or press it to an open position) located at the end position of the PCI express slot where the graphics card connects to the PC’s motherboard.
To remove the card, gently pull it out in a straight position by maintaining the card as level as you can while gripping the release clip if required.
Ensure that you have enough workspace that allows you to work on your card seamlessly. Also, all the required tools must be within arm’s reach.
Also, as a rule of thumb, once you remove the graphics card, avoid touching the copper connectors of the edge connector at all costs.
Blow-dry The Card With Compressed Air
Before starting your work on the card, blow it clean using compressed air from a can or a compressor.
This will make it easier for you to work on the card since the cleaner the parts, the less tedious the work. Similarly, you can use a small paintbrush to clean the hard-to-reach parts and blow using compressed air afterward.
Take Out The Heatsink Assembly
Before working with anything, unplug the fan connector and undo all screws. Afterward, you can proceed with disassembling the GPU cooler and unplugging the fan connector from the card.
Most cards typically feature screws on the rear backside, which you must undo to reveal the heatsink and remove it. However, some models use plastic clips that you can release using a pair of pliers and clippers.
If you realize that the heatsink still sticks onto your GPU, even though you have all undone all the retaining bolts, clips, or screws, use a plastic lever to assist you in freeing it.
Although this case rarely occurs, it is usually a result of interference from a poor quality paste that becomes hard. Subsequently, the hardening of the old paste makes it difficult to remove the heatsink.
Clean The Heatsink And GPU
If the GPU and GPU Cooler Heatsink come with factory thermal paste, ensure that you use a top-quality thermal paste removing agent search as isopropyl alcohol to make the cleaning as easy as possible.
Compared to thermal paste remover, other agents such as alcohol or methylated spirit take a long time before finally clearing the old paste.
In addition to the thermal paste remover and surface cleaner, you require a clean cloth to help remove the paste. Firstly, rub some thermal removal fluid on the cloth and wipe the surface to get rid of as much paste as you can in a single wipe.
Use a cleaner area of the microfiber cloth and repeat the process a few more times until no grime remains on the heatsink and GPU.
After that, use some compressed air to blow away any remaining dust particles or fluff that may remain from your piece of cloth.
This step is crucial since it ensures that minute dust particles that may prevent the heatsink from coming into contact completely against the GPU, thus reducing its cooling effectiveness.
With a cleaned heatsink and GPU, you have fully prepared your surface for maximum cooling.
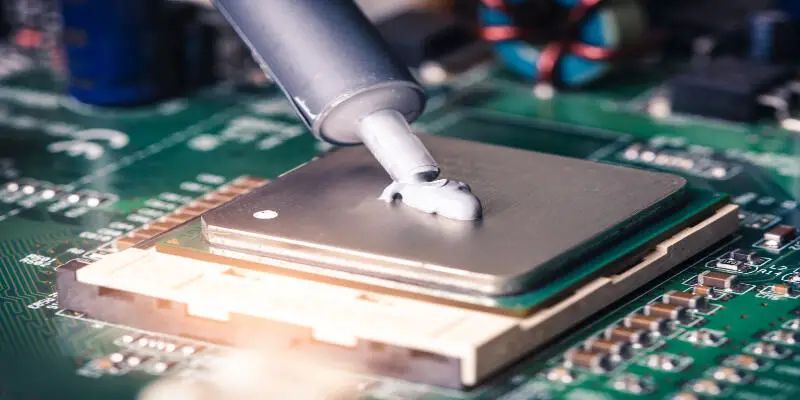
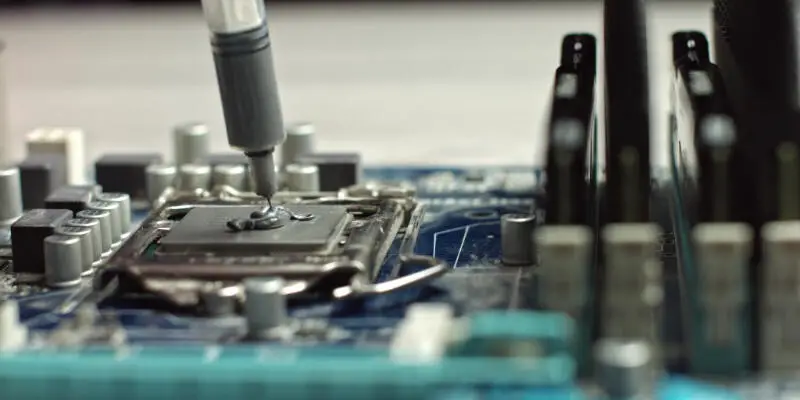
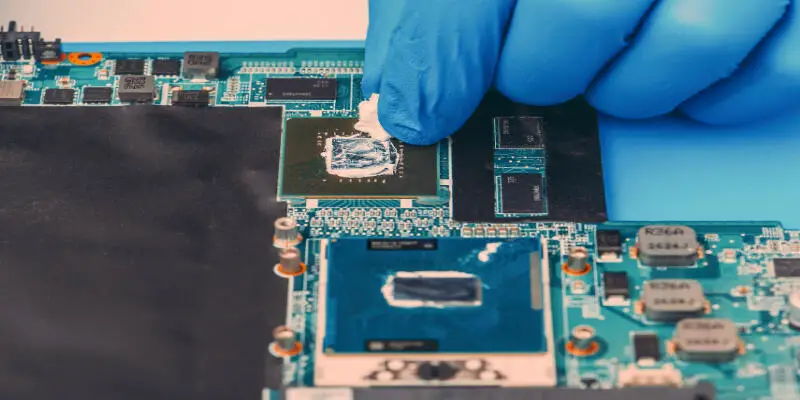
Apply The Thermal Paste
After you are through with the cleaning process, you can then apply a sizable amount of thermal paste enough to cover the whole contact area of the GPU. Once you fit back the heatsink, press it up against the GPU.
Do not apply an excessive amount of paste since the compound will ooze out over the sides onto unintended areas in addition to increase the separating distance between the metal surfaces.
Using the required amount of TIM, which is approximately the size of a grain of rice or pea, prevents spilling of the thermal compound, destroying the PCB part of the GPU or even the motherboard.
Conversely, applying an insufficient amount will not cover the entire surface area; thus, the cooling system ceases to be effective.
Although you may find it too tempting to spread the thermal paste on your own, it is advisable to let the pressure from the installed heatsink do the spreading. This is to prevent air bubbles from forming in the paste, thus negatively affecting the overall thermal conductivity.
Ensure that you use a high-quality thermal paste such as the Arctic Silver 5, which yields better thermoregulation results compared to other types, regardless of the computer is under load or when idle.
Once you finish applying the thermal paste correctly, the next step is to reassemble the heatsink as soon as you can to prevent the introduction of new dust particles on the contact surfaces or in the applied compound.
Reassemble The Heatsink
Before anything else, you’ll first have to plug the fan on the connector in before adding a screw and give it about two to three turns while holding the cooler with your free hand.
Next, have your securing screws ready for action before placing the heatsink in place. Hold the heatsink in place with one hand and use your free hand to screw the screws into place to have the heatsink secured.
Make a start with each screw without tightening any of them fully until you hand-fit in a few threads only.
In this position, reach out for your screwdriver and tighten the screws taking a few turns at a time while rotating between the screws to ensure even tightening of the heatsink.
Take extra caution when fitting the screws to avoid overtightening them. Overtightening the screws will cause stripped threads which are difficult to repair and may eventually require that you replace the entire GPU cooler.
Following this process correctly guarantees that the heatsink makes good contact with the surface of the GPU.
Reinstall The Graphics Card
The steps to reinstalling the graphics card are similar to taking it out. Ensure that the card remains in a level position before lining it up and inserting it back into its specified slot.
Check whether the locking clip at the back end of the card slot was a sliding type or features clips. Clip or slide it back into the locked position depending on the type.
Secure the clips back into place to hold the graphics card properly. Lastly, check if your GPU works properly.
Conclusion
Changing the thermal compound on your GPU should augment the operating temperature range at which the computer runs. This helps in improving the longevity and stability of your device.
Also, applying a high-quality thermal paste will save you from having to worry about replacing the compound for a long time. However, do not forget to confirm if the card’s fan spin as usual before you disassembled the heatsink.