Disclaimer: This post may contain affiliate links, meaning we get a small commission if you make a purchase through our links, at no cost to you. For more information, please visit our Disclaimer Page.
A useful guide to help you resolve Err_Name_Not_Resolved error on Google Chrome.
There are many errors you may have encountered when using Google Chrome browser. These errors are very annoying and might prevent you from loading websites. Most cases, the errors are related to network or DNS issues on your computer.
In the previous article, I have explained about Err_SSL_Protocol_Error error and solutions to resolve it. Today, I will tell you a few simple methods to fix Err_Name_Not_Resolved error on your Google Chrome browser. It’s a child error message of the “This webpage is not available” error. I have faced this error before, a few times, and it occurs because some particular reasons, such as your DNS servers block specific website addresses – expired or error cookies could be causes – or local DNS cache could be a problem.

Learn how to fix Err_Name_Not_Resolved error on Google Chrome browser.
Simple Methods To Fix Err_Name_Not_Resolved Error
Depends on which cause created it, use an appropriate solution will help to fix the error immediately. However, if you can’t determine the cause, you can try all methods for sure, there is no harm at all.
However, before getting started, I would recommend you to check your internet connection to make sure it’s connected and work fine. Sometimes, it’s just disconnected. You also need to verify your website address and make sure you wrote correctly any spelling mistake?
Remove All Cookies, Cached Files To Resolve Err_Name_Not_Resolved Error
Many DNS issues may happen on Google Chrome browser, and remove cookies & cached files is a good method to fix them. As I mentioned above, the Err_Name_Not_Resolved error could be caused by DNS issues. So applying this solution may help to resolve the error.
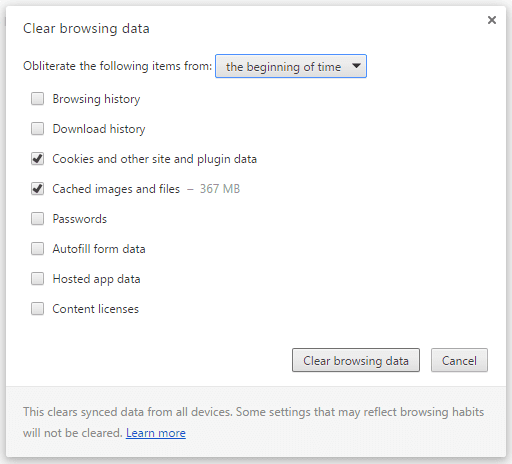
To remove all cookies and cached files on your Google Chrome browser, copy the below code:
chrome://settings/clearBrowserData
And paste into the address bar and then press the Enter key on your keyboard. Next, just select options follow the image below and click on the “Clear browsing data” button.
Flush DNS Cache And Renew Your IP Address To Fix Err_Name_Not_Resolved Error
According to reports from Google Chrome help forum, this is a good method to fix the Err_Name_Not_Resolved error, and many experts suggested it. It’s very easy to follow, just type a few simple Command Prompt commands.
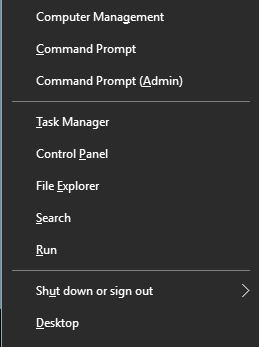
To get started, open Command Prompt program as an Administrator by pressing Ctrl + X and then press A and choose “Yes” to launch the Command Prompt program with administrative privileges.
Or you can click on the Windows start logo at the bottom-right corner, type cmd.exe, right-click on it and select “Run as Administrator”. Both methods work at the same – there would be no different.
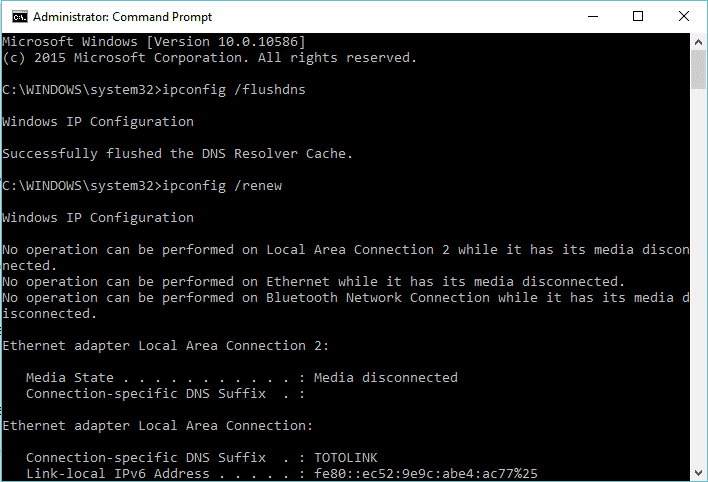
After launching the Command Prompt program, type these commands in it, one by one:
ipconfig /flushdns > Enter.
ipconfig /renew > Enter.
ipconfig /registerdns > Enter.
With these commands, it will automatically erase all old DNS cache, renew your IP address and DNS servers.
Set Google’s DNS Or OpenDNS As Your Default DNS Server
If two above methods could not help you to fix the Err_Name_Not_Resolved error, then I would suggest you to change your DNS servers from default information of ISP to be Google’s DNS or OpenDNS.
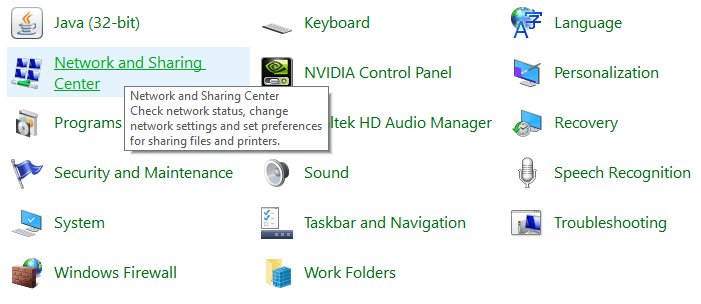
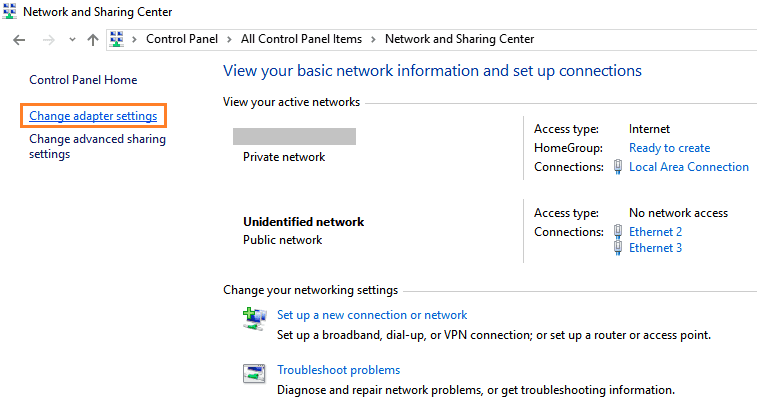
To change your DNS servers, go to Control Panel and then choose Network and Sharing Center.
Look at the left side and choose “Change adapter settings”.
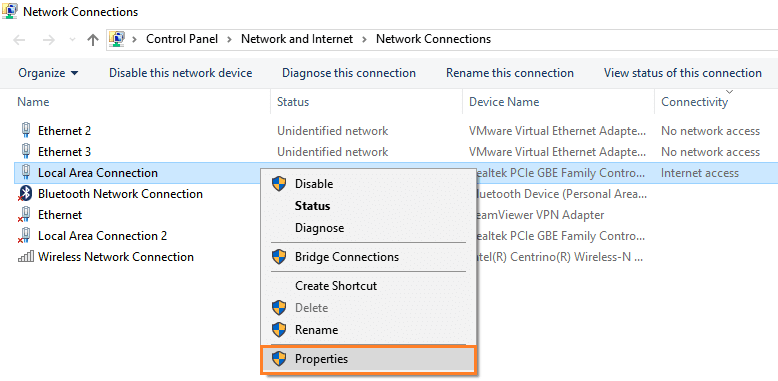
Right-click on your current connected network adapter and select Properties.
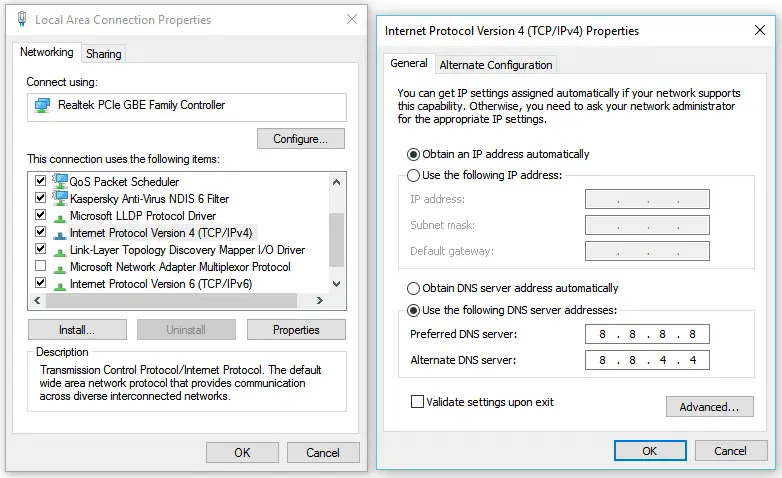
Scroll and find “Internet Protocol Version 4 (TCP/IPv4) and then double-click on it.
Choose “Use the following DNS server addresses”, enter your Preferred and Alternative DNS servers, then click “OK” to save the changes. As you can see, I used Google’s DNS service as my DNS servers. You can choose to use it or any other third-party DNS services as you want.
Got a question? Just leave your comment below.

