Disclaimer: This post may contain affiliate links, meaning we get a small commission if you make a purchase through our links, at no cost to you. For more information, please visit our Disclaimer Page.
Are you suddenly unable to access the internet? Checked your router is turned on?
The first thing to do would be to run the Window Network Diagnostic tool to troubleshoot the problem.
Related Article: Fix “Server DNS Address Could Not Be Found” In Chrome
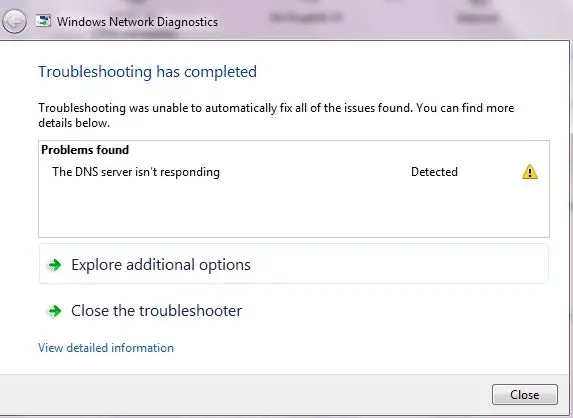
After executing the Windows Network Diagnostics tool to diagnose this problem, the tool might show you the following error message:
“Your computer appears to be correctly configured, but the device or resource (DNS server) is not responding.”
Or if it doesn`t give the above message, it might provide you with one that is closely similar to the error text below:
“The DNS server isn’t responding.”
If you`re experiencing this problem, you don’t need to worry, because the dns error is readily fixable.
“DNS server not responding error” is a common issue that occurs on many Windows computers.
The issue disallows a PC to access the Internet, regardless of the router.
So if you`ve seen any of these messages above, which often occur in Windows 7, Windows 8, 8.1, and Windows 10, it might be a problem that relates to the configuration of your computer, hence why the server is not responding.
Table of Contents
Fixing “DNS Server not Responding” Error
In this post, I will show you 6 ways to solve the DNS server not responding error, depending on what situation your PC is in.
It isn`t a must you try all the fixes below, work your way down the list until you bump into one that works for you.
It is usually as simple as fixing the dns cache.
How To Fix “DNS Server Not Responding” Error In Windows
- Solution 1: Fix the network address
- Solution 2: Reset DNS settings
- Solution 3: Update Your Network adapter driver
- Solution 4: Rollback the network adapter to an older version
- Solution 5: Enter MAC Address Manually
- Solution 6: Restart your Router or Modem
All the above fixes are very straightforward and easy to follow.
Let`s start from the basis.
Solution 1: Fix Network Address
First, the “DNS not responding” error might be a result of incorrect DNS server address. To correct the DNS server address, here is a step-by-step procedure to get it set back.
- Click on the Start button and key in Run to access the Run app. Alternatively, you can press the Windows logo key and R simultaneously to open the Run box directly.
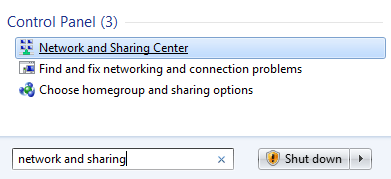
- Feed-in Control and hit the Enter button to open the control panel
- Navigate through to Network and Sharing Centre and click on it
- On the Network and Sharing Centre windows, select the Change adapter settings on the top left.
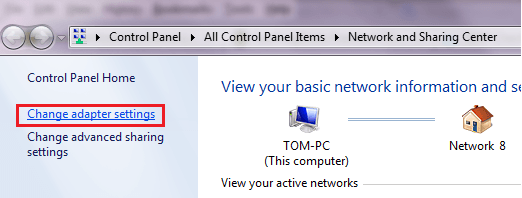
Tip: You can quickly access this section by pressing Windows + R and then fill out “ncpa.cpl” without the quotes and press Enter.
-
- Next, right-click on your network adapter (Local Area Connection, Ethernet, or Wi-Fi) and select Properties.
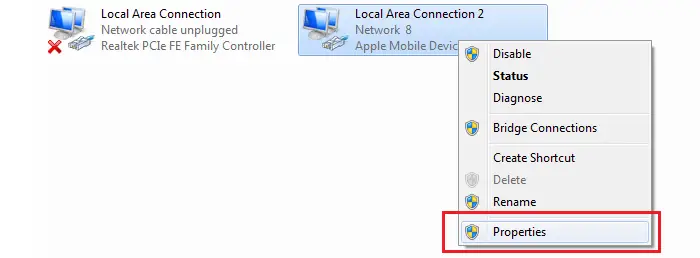
- Click on Internet Protocol Version 4 and hit the Properties button
- Set your default DNS to be Google’s DNS.
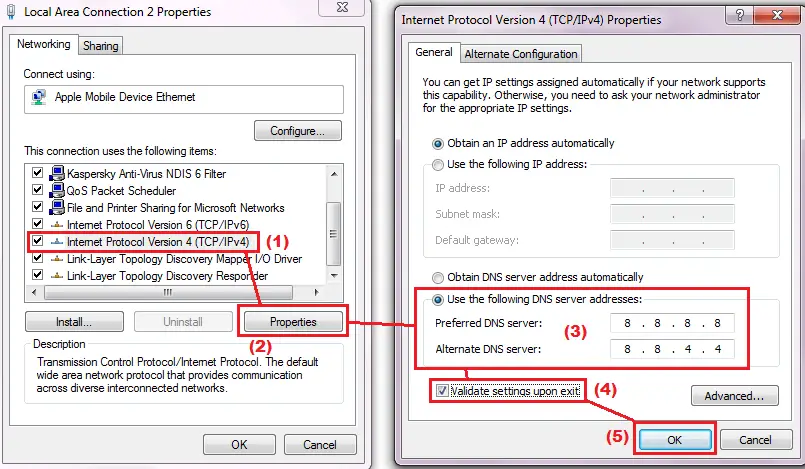
The preferred and alternate DNS server of Google’s DNS is 8.8.8.8 and 8.8.4.4, respectively.
If you don’t want to use Google’s DNS, you can use OpenDNS: OpenDNS address: 208.67.222.222 and 208.67.220.220 Or pick any of these third-party DNS servers.
They are also the best alternative DNS servers.
- Remember to check the box, “Validate settings upon exit” before clicking on the OK button.
Alternatively, you can fix the Network Address Manually. And here`s a straightforward guide on how to go about it:
- Open a Command Prompt by pressing Windows + R and type cmd or cmd.exe and then press Enter.
- In the Command Prompt window, type ipconfig /all and then press Enter.
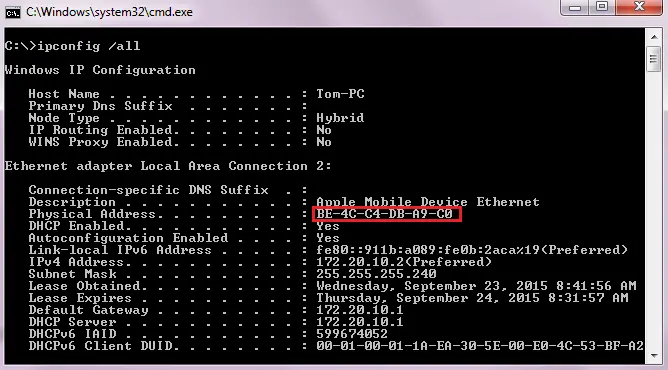
- You will see a physical address as the image above. Write it down!
- Next, go back to the Network and Sharing Center. Right-click on your adapter and choose Properties.
- Click on the Configure button and choose the Advanced tab.
- In the Advanced tab, find the Network Address and enter the physical address you have seen in the previous step, without dashes. Then click on the OK button.
For example, if your physical address is BE-4C-C4-DB-A9-C0, you will type BE4CC4DBA9C0.
- Finally, restart your Windows computer, and the problem will be solved.
Read Article: Fix Application Has Been Blocked From Accessing Graphics Hardware
Solution 2: Reset DNS Settings
Here is the second method to fix the DNS server not responding error on your Windows PC.
Use this solution when the first method can’t help you to solve the problem.
Tip: You can also use both methods to fix this issue. There will be no harm to your computer at all.
[full-related slug1=”dns_probe_finished_no_internet” slug2=”fix-dns_probe_finished_nxdomain-error”]Step 1: Open a Command Prompt program by pressing Windows + R on your keyboard, type “cmd.exe” and press Enter.
Step 2:Perform all commands below, one by one:
- ipconfig /flushdns -> Enter
- ipconfig /registerdns -> Enter
- ipconfig /release -> Enter
- ipconfig /renew -> Enter
- netsh winsock reset -> Enter
Step 3: After finishing, you can reboot your computer. The problem should be gone after restarting.
Solution 3: Update the Network Adapter Driver
Yes, an old network adapter driver might be the cause of the “DNS server isn`t responding” connect issue . Checking if your driver is up-to-date and compatible with your current operating system might be another solution. And here is the procedure to readily check if your network driver is up-to-date:
- Press the Windows key + X keys to open the Power User menu and select Device Manager
- Expand Network adapters.
- Select the name of your Network Adapter Driver, right-click on it, and select Update Driver Software
- Hit the Search automatically for updated driver software option.
- Execute the on-screen instructions and click Close to complete the task.
In some cases, Windows updates may lack new drivers available. In such situations, head over to your computer manufacture support website to download the latest driver.
Assumedly, you can`t connect to the internet. Thus, you require another computer with an internet connection, and then save the driver on an external drive and manually install it on your computer.
Here`s an in-depth guide to walk you through the manual installation procedure from the external drive.
NOTE: This process works after downloading the Network driver update from a computer with internet access.
- Use the Window key + X keys to open the Power User menu and select Device Manager
- Expand Network Adapters
- Select the name of your adapter, right-click it, and choose Update Driver Software
- Click the Browser My computer for device software option
- Hit the Browse button and select the driver folder you downloaded
- Hit the Next button
- Execute the on-screen instruction and hit the “Close” option to complete the update.
After step 7, restart your computer and confirm if your PC has internet access.
Solution 4: Roll Back the Network Driver to Previous Version
In some instances, the “DNS do not respond” error can be a result of a recent driver update release for a network adapter, which isn’t compatible with the operating system you`re using.
In such cases, returning the Network adapter driver to an older version might work excellently. To roll back to an older version, here are steps to get it through:
- Press the Windows key + X to access the Power User menu and select Device Manager.
- Expand Network adapters.
- Select the name of your adapter, right-click it, and select Properties.
- Next, hit the Drive tab
- Then, click the Rollback driver button. (If this option is grayed out, then it means your system lacks a previous version to roll back to.)
- Click OK
- Then restart your computer to complete the process.
Once you have completed the process, open your web browser to confirm if you have access to the internet.
Solution 5: Enter MAC Address Manually
A Media Access Control address (MAC) of a device is a distinctive identifier appointed to network interfaces for communications at the data link layer of a network segment.
MAC addresses for many IEEE 802 network technologies, including Ethernet and WiFi.
Manufacturers of network interface controller are the one who assigns Mac Addresses they store the address in its hardware such as the card`s read-only memory or other firmware mechanisms.
Entering the MAC address manually can fix the “DNS SERVER not responding error.”
However, it`ll first requires you to locate it using an elevated Command Prompt. Here is the step-by-step procedure to find your Mac Address:
- First, key in cmd on the search box and right-click on the Command Prompt app.
- Next, select Run as an administrator. The User Account Control prompt will ask you if you want to allow the Command Prompt to make changes to your computer, select yes to access cmd with administrative privileges.
- Type in ipconfig /all once the cmd windows open. It will open a list of information about configuration.
- From the list, look for “physical address “and take note of it as you`ll need it on the next step.
Now you have your Mac address. The next thing is to configure your network connection manually. Configuring network connection manually
- Right-click on the Start menu (The Windows logo on the bottom left of your screen) and select Network Connections. Similarly, you can head over to Settings and choose “Network & Internet.”
- In the Network and Internet setting window, select the type of your connection on the left pane, for instance, Wifi or Ethernet, and hit the Change adapter options.
- Next, right-click on your connection and select Properties from the drop-down menu.
- On the Properties windows, select Client for Microsoft Network, which is the default selection and click on Configure
- Then, select the Advanced tab and navigate to Network Address under Property.
- Next, select Value on the right pane and enter your MAC address, which you noted earlier.
- Hit the OK tab below the pane to save the changes. Check if the procedure above fixes the “DNS server is not responding error.
Solution 6: Restart Your Router or Modem
In some cases, modem or router may operate faultily, so that the DNS server could stop responding. And when that is the case, a simple execution like restarting your modem or router might solve the problem.
Updated: I have received several emails from users that tell me that their firewall has blocked the internet connection. That could be a reason why you see this DNS error on your computer.
To diagnose and troubleshoot this issue, you should disable your Windows firewall (or any third-party firewall programs).
I hope this short guide can help you to solve the DNS server not responding error on your Windows computer.