Disclaimer: This post may contain affiliate links, meaning we get a small commission if you make a purchase through our links, at no cost to you. For more information, please visit our Disclaimer Page.
Hard drives are so common in our lives that we may not even know what it means to live without them. They store files, games, music, and videos for us. However, do they need power?
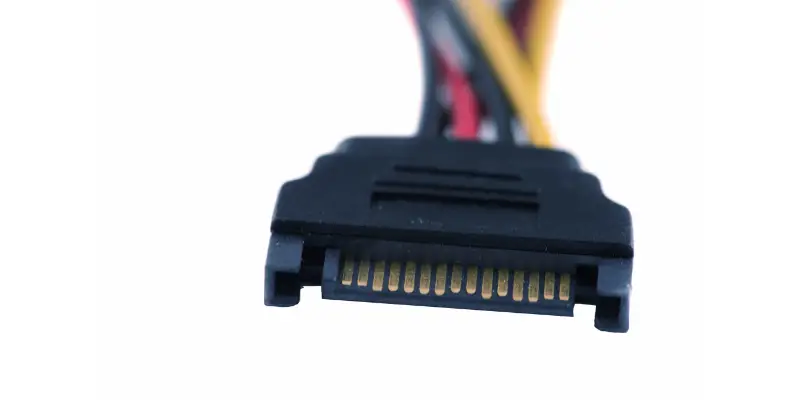
Hard drives need electrical power to operate. This depends on the drive you are using. For example, HDD drives may require about 5v or 12v. The SATA drives are normally composed of two parts, the larger part for power connection and the narrower part for use as an interface for data.

Table of Contents
Why Do Some Hard Drives Need Power?
There are several reasons hard drives need power. They include:
1. For Operation
Both Solid State Drives (SSDs) and Hard Disk Drives (HDDs) need power to operate. They are electronic gadgets functioning as data storage components in computer systems.
2. As Electromechanical Devices
HDDs are made up of many moving parts and so categorized as electromechanical devices. These parts include the motor spinning the disk, the disk which stores data, and the head and armature reading the disk.
It is similar to a record player, faster, more precise, and only smaller by a slot.
3. Storing Data
HDD requires power for the operation of discrete components that allow storage of data on the drive. Data storage happens through a magnetic charge on a disk coating known as ferromagnetic film. HDDs don’t need the power to keep storing data because the charge remains polarized when the disk is rewritten.
However, SSDs operate a bit differently. They are composed of non-moving components and use electrical charges to store information.
4. Reading and Transmitting Data
SSDs require power to write and read charges. They also require power to transmit the information to a computer. Compared to HDDs, SSDs require less power to do this, making them more efficacious to operate.
Does A 2.5 Hard Drive Need Power?
The adapters with no external supply of power are generally designed for 2.5 hard drives and other smaller drives. This is because the power they need is lesser and can operate off a single supply of 5V.
Adapters coupled with a 44pin mini-IDE connector incorporating +5V/GND on the additional four pins on top of a regular 40-pin IDE can power a 2.5 drive because it doesn’t require any additional rails.
3.5 drives require more power than these, and homogeneous adapters are created for that.
In addition, the 3.5 drives will need 12V for the larger motors being used, and these adapters will not produce that voltage rail. This is why your USB connector is unable to spin up your drive.
These adapters are functional on 2.5 drives as they supply the necessary voltage rails.
Does A 3.5 HDD Need Power?
3.5 HDD generally needs a 12V connection of power that the adapter of a hard drive or the USB port cannot provide. The USB port power potentialities merged with the power needs of the connected drive will dictate the workability of the hard drive adapter in the setup.
An individual USB cable cannot power many 3.5 drives; therefore, Y-adapters of a USB are designed to power the drive-by tapping power from the two ports without an external connector.
However, a single USB cable can power a 2.5 drive. With a 3.5 drive, you must obtain an appropriate external enclosure that supports its power specifications. The USB port power supply should be larger than what the drive requires.
USB 2.0 can supply up to a maximum of 0.5A (500mA), while USB can supply up to a maximum of 0.9 A (900mA). It is contained within the USB description that a device must be disconnected from the target system if it tries to draw excessive power.
How to Connect SATA Hard Drive to Power Supply
It is impossible to plug the hard drive into your supply of power. Instead, you plug the power supply into the hard drive. SATA is one of the straightforward simple connections convenient for an extension.
You must plug your power cable with the bigger tip into the wider connector port on the left-rear of the HDD. If the power cord is difficult to fit, be sure it is not inverted. Connect the data cable to the hard drive’s SATA port.
Your supply of power may not be having the connectors for SATA if it is older; hence you will require a Molex-to-SATA connector. Plugs of Molex can be white or black and have four pins.
How to Install a Desktop SATA Hard Drive
You need to follow these steps while installing SATA hard drive on your desktop:
1. Turn off the computer
Remove the side panel and turn off the power push button behind the case. In most cases, both panels must be removed to secure the hard drive, however many feature detachable housings.
2. Ground yourself.
Before you begin working on the computer’s interior, be sure you have discharged any electrostatic charges. If your desktop is still plugged in but turned off, you can discharge any of the case metals exposed. Furthermore, contact with water will assist you in discharging the charge.
3. Locate the hard drive bay.
Although location varies depending on the case, it is usually beneath the optical drive bay. In order to replace or upgrade your hard drive, look at one that is already installed.
4. If replacing, first disconnect the old hard drive.
Disconnect the two wires that link to the rear of the HDD you want to replace. To add storage to an existing disposition, leave the initial hard drive in place and skip this step.
5. If adding, disconnect the old hard drive.
The method for inserting the HDD into the drive bay varies per system, however two screws on each side of the drive are generally required to keep it in place. Remove the screws and slide the hard drive out of the drive bay to remove the old drive.
6. Place the new drive into the empty bay.
You should try maintaining considerable space in between the existing drive and the new drive as this helps promote cooling and airflow.
Ensure that the black plastic side faces down and the metal faces up. Also, confirm that the SATA connection ports at the back of your drive are reachable.
7. Ensure drive security.
The drive is secured into the drive bay using two screws inserted into both sides of the hard drive over the holes corresponding to your drive bay.
8. Couple the SATA cables onto the hard drive.
Connect the power cable, insulated into the wider connection port located on the HDD left-rear.
9. Connect the information cable to the motherboard.
Connect the information cable to a SATA port on the motherboard to attach a drive. When replacing your old drive, you must have the information cable connected.
10. Complete the installation.
Once you have connected and secured your drive, secure your desktop and power it on. Before using your new drive, you first have to configure it.
Conclusion
Hard drives generally need the power to run, depending on the drive you are using, as HDDs may need 5V or 12V. The USB’s percentage voltage can be provided, but for hard drives that require 12V, they will need a power connector or a connection that is direct to the Power Supply Unit.
The complete connector definition is specified, and devices that use SATA drives can connect the two drive’s connector parts to the connectors on a computer’s motherboard using either a short ribbon cable or a matching connector.