Disclaimer: This post may contain affiliate links, meaning we get a small commission if you make a purchase through our links, at no cost to you. For more information, please visit our Disclaimer Page.
Computers are great for viewing files, walls of text, or high-definition photographs on the screen one after the other. Occasionally, you may want to freeze or stop the screen’s action of the screen from capturing certain imagery or text that is going by too quickly.
Some websites display text, images, or video frames you may want to capture for various reasons, but they often slide by too fast to do anything like this. You may also want to capture certain frames on your personal files and being able to freeze the screen might help with this action, too.
There are some methods, such as using “Windows Key+ P” or going into display properties. Read on to learn other methods and how to do them specifically.
Table of Contents
Can You Freeze the Screen on Windows 10?
Yes, there are methods by which you can freeze the screen on a PC or laptop running Windows 10. It can be awkward when your computer is the primary device for a large presentation, and you have prepared everything only to have slides or another information move by too quickly.
In other cases, you may wish to use your laptop for some tasks during a presentation but are unaware that the unfrozen screen is still moving before you can relay information to clients and colleagues.
For many reasons, you may want to freeze the screen on a Windows 10 PC, and we will take you through the main ways.
It is important to note here that we’re talking about making sure the windows, programs, or tasks you need to work with don’t move on the screen.
In most cases, this will be useful when a user needs to work on the primary display device while keeping a secondary display frozen or on a different task. This is beneficial in presentation settings, but can also have other uses.
We mention this because many people refer to “freezing the screen” as locking the desktop. This completely separate function revolves around access and security rather than convenience.
Locking the desktop also freezes the screen on a single display, usually a password interface, and it will stay that way until the screen goes to sleep or switches over to a screen saver.
The desktop will remain locked even after the computer awakens via moving the mouse or a key press. This article discusses freezing the screen for image or text capture, convenience, or other things unrelated to locking the desktop’s functionality.
Last, if your screen in Windows 10 is freezing, unfreezing, or staying frozen when you’re not asking it to, this could point to a problem with outdated display drivers.
Sometimes, these drivers are corrupted rather than outdated, and a simple reinstall could fix that issue.
How Should I Freeze the PC Screen for a Few Minutes?
If you want to manually freeze the screen on your PC, there are a couple of major ways to go about it.
Each method involves a few simple key presses or button clicks, and we’ll take you through them while explaining some important details to remember.
1. If you’re using your laptop as a primary device for presentations on an overhead that doesn’t include a freeze function on its own remote, extending your PC’s desktop is one of the easiest ways to freeze the screen and separate the two.
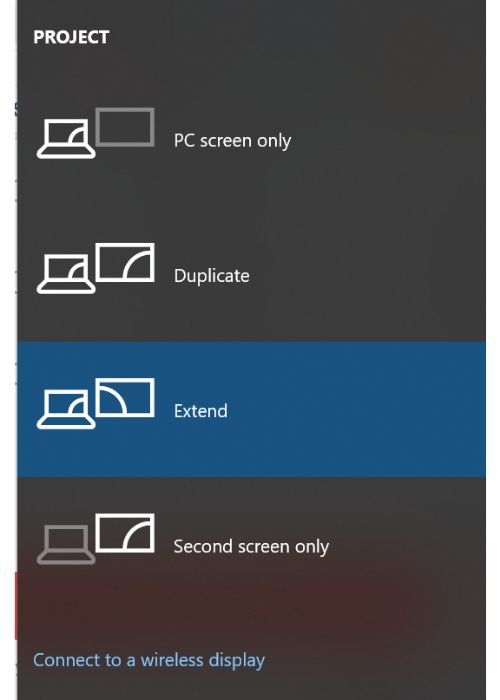
2. On Windows 10, you can press the ‘Win’ and the ‘P’ keys to enter Extended Desktop Mode. From here, you will have several options for extending the desktop.
3. The most common options are PC screen only, duplicate, extend, and the second screen only. You may not see these options when you present, but the wording should be similar.
4. For freezing the screen, it’s essential to understand the difference between the Extend and Duplicate options. In our case, we want to go with extend. Extend will duplicate your monitor for the projector but still allow you to keep windows and actions separate for both.
5. In short, an extended monitor gives you a quick and easy way to freeze the screen on one display when you need it, especially if you need to continue other tasks on the primary display.
6. You can achieve similar results using your PC’s ‘Display Properties’ submenu. You only need to right-click on the desktop and choose the wording that matches “display settings” or similar.
7. Once you’ve expanded or extended your desktop in this manner, you can create a “frozen” screen that allows you to keep working as needed on your main monitor, or vice versa, depending on the options you’ve chosen for the expanded desktop.
8. When extending the desktop to freeze the screen on the primary display, you can end the extended session to shut off the secondary display and return the PC to its normal state.
Is There a Way To Save a Picture of Frozen Screen?
There could be many times when you might want to save a digital picture or other imagery from your screen. You might want to have it to remember something later, or share it.
It’s also a good way to export it to a different program on your PC if you want to edit it. Whatever the case, there is a way to save a picture of a frozen computer screen.
For our purposes, we will assume that you have used the method or something similar to act as a sort of pause function, and that the computer itself is not stuck on a particular screen.
Regardless, there are ways to go about possibly saving a picture, if you need to show when and how the computer is acting up. We wll be taking you through a few of main ways to grab a picture of a frozen screen. However, these methods should also work even if your screen isn’t necessarily frozen.
1. If you want to take a screenshot of your Windows 10 screen, one of the easiest ways to do it is by hitting “Alt” .
2. Print Screen is usually abbreviated as ‘prt sc’, and you should be able to find it on the keyboard in the same row as the various numerical ‘F’ keys.
3. For an easy way to grab your screen and save it automatically to the drive of your choice. You can press ‘Win’ and ‘Print Screen’.
This action will save the image capture to the default location. The default location is wherever your PC saves images and it is usually a folder called ‘Pictures’.
Once you’ve captured the screen’s image, you can also paste the captured screen into a photo editing program of your choice. Windows 10 comes with a couple of great options you can already use for this right from the start or there are others you might like from third-party developers.
If your PC is on the display window of your choice, you can also right-click on the image and select ‘Save As’. This action will open a secondary window from which you can select the save location.
This is a great method to use if you’re on a screen with multiple images but only wish to save a particular one.
Can You Freeze the Screen on a Chromebook?
A Chromebook is a great choice for people who don not need the functionality of a full laptop. It is typically small, lightweight, portable, and contains many useful features for people who need something bigger than a tablet.
There could be times when you might want to freeze the screen on a Chromebook, the same way you might want to do so on a traditional PC.
Unlike a PC, there is no way to freeze the Chromebook using some key combinations we discussed earlier. However, you can still do the screenshot or image capture methods we discussed with the PC.
1. To take a full screenshot, use the ‘Ctrl + F5’ key combination. This will take an image capture of your Chromebook’s entire screen.
2. If you want to capture only a partial portion of the screen at the time, you can use ‘Shift + Ctrl + F5’ instead. Once done, you’ll drag using the touchscreen to select the portions of the display you wish to capture.

Can You Freeze the Screen on an iPad?
Smaller than either a desktop PC or Chromebook, Apple’s iPad is a popular choice among people who need a powerful computer in tablet form. Just like the PC or Chromebook, there are ways to freeze the screen on the iPad if you wish.
1. Freezing the screen on an Apple iPad, isn’t quite as straightforward as with the other two devices. You’ll need to set up and use Apple’s special ‘Guided Access’ suite of features.
2. Start using this feature by going to ‘Settings’, then ‘Accessibility’, then turn on the option for Guided Access.
3. Once done, you can start a session by opening the app of your choice. Then, give three clicks to either the ‘Home’ button or the side button, depending on which version of the iPad you are running.
4. If you would like a portion of your screen to freeze, you can use a finger to circle the parts that you would like to disconnect from touchscreen functionality.
Conclusion
You might use several ways to freeze the screen on a Windows 10 desktop, a Chromebook, or an iPad. the methods might be a bit different in all cases, but they mainly involve simple taps or key-presses to get started.
Once done, you can freeze various screens for image captures or use them to keep tasks on different screens from interfering with each other.