Disclaimer: This post may contain affiliate links, meaning we get a small commission if you make a purchase through our links, at no cost to you. For more information, please visit our Disclaimer Page.
When you encounters errors that impossible to fix, it’s time to reset the whole Windows operating system: refresh your Windows OS like a new installation, without any apps or user data. However, it should be the last option because it will remove all installed apps and user data from your computer, only keep Windows system files.
I would recommend you to use Windows System Restore instead of resetting the operating system as no data will be lost. But you will have to enable this feature before encountering errors, or there is no way to use it.
In this guide, I will tell you more about the method to reset Windows 10 OS without losing your personal files or clean up the whole drive where your Windows 10 OS is installed and make it looks like a new installation of Windows 10 without any apps, personal files and settings.
A step-by-step tutorial to learn how to reset Windows 10 PC using “Reset this PC” feature.
“Reset this PC” is a useful feature to help you and other Windows 10 users to reset their computer or wipe out it, in case of getting unknown errors or issues that you couldn’t fix. There are two options you can select:
- Keep your personal files.
- Removes everything.
How To Reset Windows 10 PC?
Before resetting your Windows 10 computer, make sure you have backup important files and documents. Then, take a look at below instructions and follow up to reset your computer.
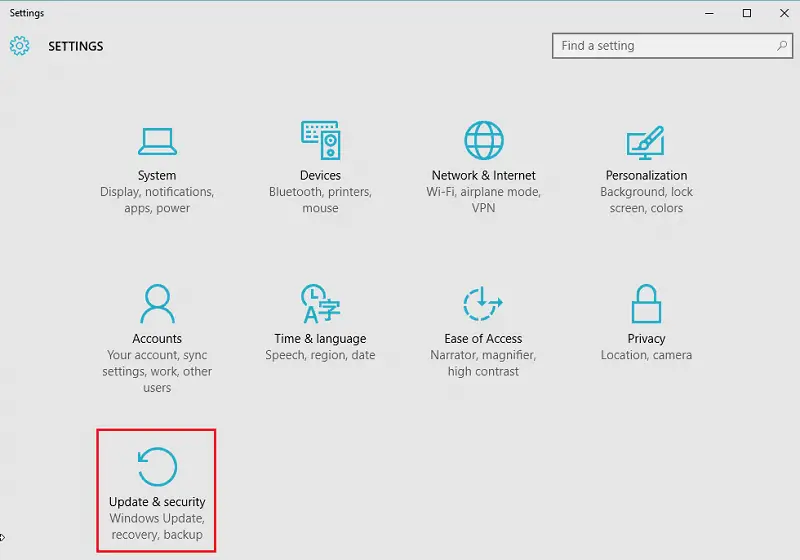
1. Go to Start > Settings and select Updates & security.
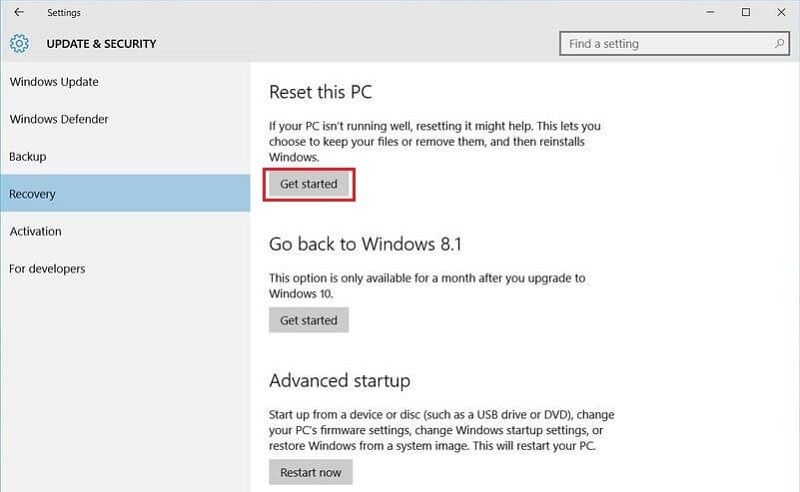
2. Select the Recovery tab and then click on Get started button of the Reset this PC section.
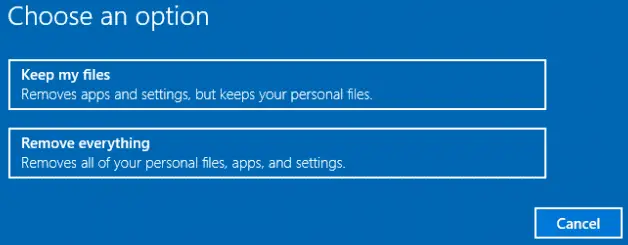
3. You will have two options to choose:
- A. Keep my files: This option will remove your apps and settings, but keep your personal files.
- B. Remove everything: this option will remove everything on your C:\ drive (or wherever you have installed your Windows 10 OS), make your computer be a fresh installation of Windows 10, without any personal files as well as settings.
4. If you select the option A, it will redirect you to the step #6, below.
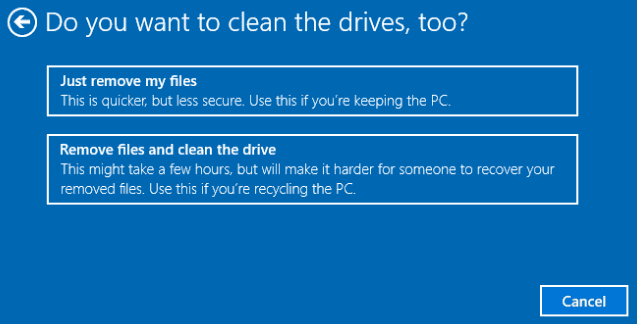
If you choose the option B, it will ask you “Do you want to clean the drives, too?“. In this case, you can select “Just remove my files” or “Remove files and clean the drive“.
5. A warning message would be displayed on your screen: “This PC was recently upgraded to Windows 10. If you Reset this PC, you won’t be able to undo the upgrade and go back to the previous version of Windows.” What’s it?
It’s mean if you have recently upgraded your current Windows (Windows 7 or Windows 8, 8.1) to Windows 10 in less than 30 days, then the previous Windows is stored as a Windows.old folder in your primary storage. If you wipe out the main drive (C:\) and remove all files, you will not be able to undo the upgrade or go back to the previous version of Windows.
If it’s not a problem, then just click on the Next button.
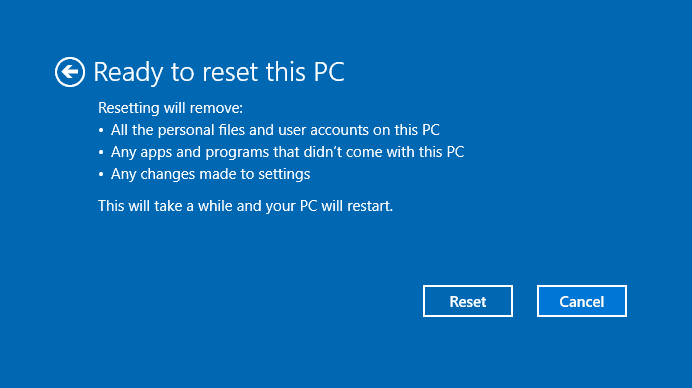
6. Simply click on the Reset button to reset your Windows 10 computer. The Windows will restart and the process will be started. It will take a few minutes to reset your computer.
When the reset process is completed, you will able to use your Windows 10 computer again. Check if the errors that you have encountered are still there or gone.
I hope this guide can help you to learn more about how to reset Windows 10 PC. If you found this is a useful article, then share it with friends and other Windows 10 users.
If you have any questions, feel free to ask by leaving your comment below.

