Disclaimer: This post may contain affiliate links, meaning we get a small commission if you make a purchase through our links, at no cost to you. For more information, please visit our Disclaimer Page.
What is the WSAPPX process and why is it using a lot of the CPU resource?
Have you ever looked at the WSAPPX process in Task Manager? Sometimes, you might find it uses a lot of your CPU resources. For users who don’t know yet, the WSAPPX process belongs to the Windows Store application, also known as WSService.
Last week, I encountered the WSAPPX high CPU usage issue on my Windows 10 computer. When I booted up and logged into it, I noticed the WSAPPX process was using around 40% of my CPU resource.
Also Read: Fix Svchost.exe (netsvcs) High CPU Usage or Memory Leak Issues.
I expanded the process and found there are three Windows services that runs under it, including Windows Store Service (WSService), AppX Deployment Service (AppXSVC), and Client License Service (ClipSVC).
All those services provide infrastructure support for the Windows Store application, and its apps. If you try to disable any of those services, the Windows Store may not function properly.
How To Fix WSAPPX High CPU Usage Issue In Windows
The WSAPPX process is related to the Windows Store. However, if you found that it is using too much CPU or memory resource of your computer, and even the Windows Store doesn’t run, I would recommend you stop Windows Store from running, as a temporary solution. There is no permanent solution to solve the WSAPPX high CPU usage problem in Windows.
In Windows 10, the Windows Store is a significant application. That’s why you can’t disable it from Windows Services, or Control Panel. The only option to turn it off is to use the Local Group Policy Editor.
To disable the Windows Store in Windows 10, follow these instructions:
- Press Windows + R to open Run dialog box.
- Type: “gpedit.msc” without the quotes, and press Enter.
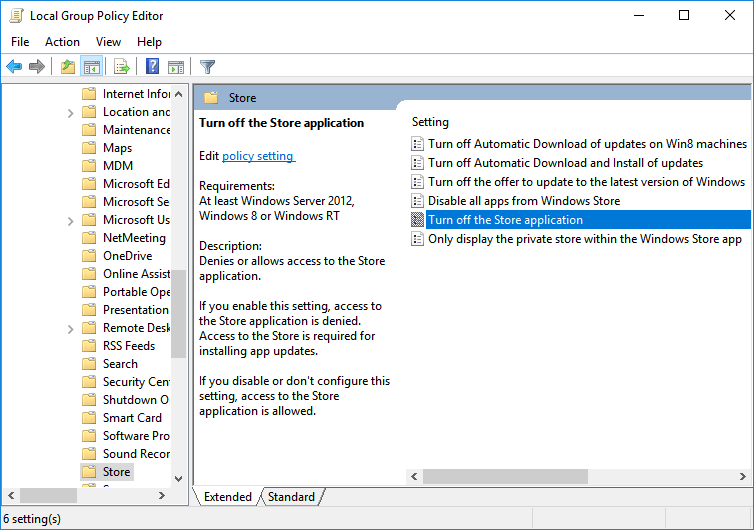
- In the Local Group Policy Editor window, go to Computer Configuration -> Administrative Templates -> Windows Components -> Store.
- Find “Turn off the Store application” option, double-click on it and choose “Enabled“.
- Click on the “Apply” button and then “OK“.
- Restart your Windows PC.
You may see that the WSAPPX process is still running in Task Manager while the Windows Store is turned off. Don’t worry! Your CPU resource will not be compromised by this process anymore.
To disable Windows Store in Windows 8, and 8.1, follow these instructions:
If the version of Windows 8 or 8.1 you use isn’t Windows 8 Professional or Enterprise, then the Local Group Policy Editor isn’t available. To disable Windows Store, you have to use the Windows Registry.
- Firstly, press Windows + R, type: “regedit”, without the quotes and press Enter. Sometimes, your computer may ask you “Do you want to allow this app to make changes to your device?“. You have to choose YES to start to use Windows Registry. If the User Account Control is disabled, then your computer won’t ask you this question.
- In the Registry Editor window, go to the following key: HKEY_LOCAL_MACHINESOFTWAREPoliciesMicrosoftWindowsStore
- In case the WindowsStore key doesn’t exist, you have to create it. To do so, right-click on the Microsoft key, choose New -> Key and then type: WindowsStore.
- After that, create a new DWORD Value named RemoveWindowsStore and set 1 as the Value data of it.
- Close Registry Editor and restart your computer. The Windows Store will be disabled after rebooting.
If you don’t want to follow all those steps above to disable Windows Store via Registry Editor, just download this file and double-click on it.
Everything will automatically be done immediately. You only need to reboot your PC.
Is There any Other Method to Fix WSAPPX High Usage Issue?
Along with disabling the Windows Store, there are also a few other solutions you can try. According to the reports from users on the Microsoft forum, these solutions helped them to resolve the WSAPPX high resource usage problem.
So I added those solutions to this article as reference. They may, or may not work with you.
Disable Superfetch and Windows Search Services
According to some reports from users, disabling Superfetch and Windows Search services also helps to resolve the WSAPPX high CPU usage.
To do so, follow these instructions:
- Press Windows + R to launch the Run dialog box, type: “services.msc” without the quotes and press Enter.
- Search for the “Superfetch” service, right-click on it and choose “Properties“.
- From the “Startup type” drop-down list, select “Disabled” and then click on the “OK” button.
- Restart your Windows PC and verify whether the problem persists.
In case the problem remains, go to Windows Services follow the method above, search for Windows Search and then disable it.
Besides the methods above, I would recommend you use an antivirus program to scan your computer for remove viruses or malware. Sometimes, those malicious programs can cause this WSAPPX high resource usage problem, including high CPU, RAM, and disk usages.
If you have any questions or problems regarding this article or the WSAPPX process, don’t hesitate to let me know by leaving your comment below.

