Disclaimer: This post may contain affiliate links, meaning we get a small commission if you make a purchase through our links, at no cost to you. For more information, please visit our Disclaimer Page.
In this article, we’ll be tackling the infamous “Server DNS Address Could Not Be Found” message that affects Google Chrome users.
If you get this error, don’t panic. This is a pretty common error that can be resolved.
Here are the basic steps you can take to fix the “Server DNS Address Could Not Be Found” in Google Chrome.
Read Article: DNS Server Not Responding: How To Fix Error In Windows
Table of Contents
Fix #1: Clear Chrome’s Host Cache
The first step you should take is to clear Chrome’s host cache.
- In your Chrome browser’s URL bar type copy and paste: chrome://net-internals/#dns
- This will take you to the below screen, simply hit the Clear Host Cache button
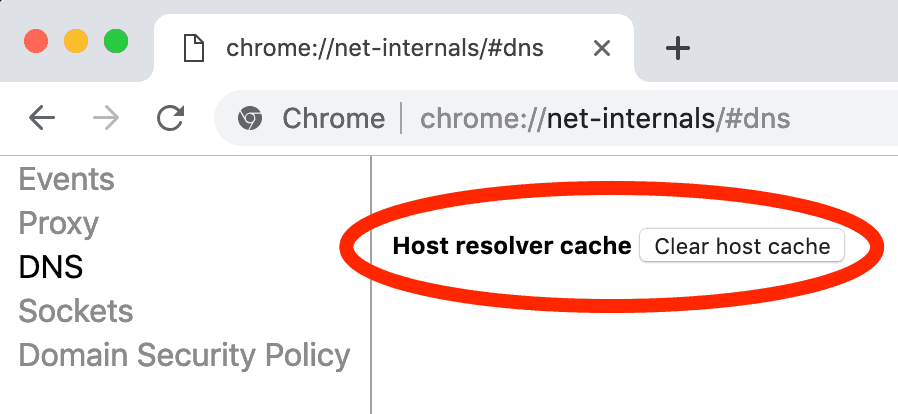
- If that doesn’t work, move on to Fix #2.
Fix #2: Replace Your DNS Server With A Third-Party Provider
In most cases, there is a problem with your default DNS server from your ISP. Somehow, your computer can’t be connected or doesn’t respond so it can’t match your requested domain name to the right IP address.
Replacing your default DNS server with an alternate DNS server address through third-party services like Google’s DNS or OpenDNS will help to load a website faster and more securely. It will also be more stable. This should eliminate the error message.
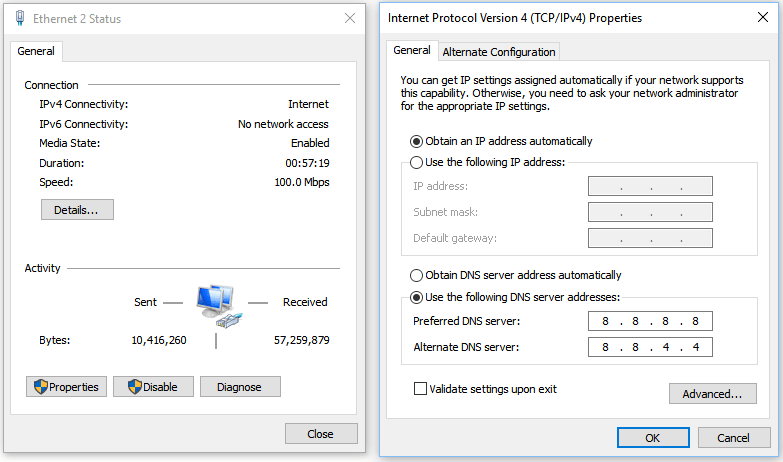
To change your preferred DNS server in Windows 10::
- Open Control Panel
- Click “Network and Internet”
- Click “Network and Sharing Center”
- On the left, click “Change adapter settings”
- From there, right-click the network and select “Properties”
- Select Internet Protocol Version 4 (TCP/IPv4)
- Select Properties (again)
- Click “Use the following DNS server addresses”
- Enter your preferred DNS server
- Hit “Ok”
The IP addresses of Google’s DNS are as follows:
8.8.8.8
8.8.4.4
The IP addresses of OpenDNS are as follows:
208.67.222.222
208.67.220.220
Fix #3: Flush DNS Cache And Reset IP Configuration
All DNS entries and IP addresses are stored in the cache of your computer so that the same queries can be run. If a website has changed its DNS entry or IP address lately, then you need to clean up all outdated entries. Otherwise, it will cause DNS errors, like I mentioned above, including this one.
Don’t know how to clear DNS cache and reset IP configuration? Here’s how to do it:
- Press Windows + X, then press A to open the Command Prompt program with administrator privilege.
- In the next step, perform all the following commands below, one by one:
ipconfig /flushdns
ipconfig /registerdns
ipconfig /release
ipconfig /renew
- Then perform the these next commands:
netsh winsock reset catalog
netsh int ipv4 reset reset.log
netsh int ipv6 reset reset.log
That’s it! You just need to restart your computer, and then everything should be back to normal.
Read Related Article: 6 Ways To Fix “Your Connection Is Not Private” Error In Google Chrome
Fix #4: Restart DNS Client Service
In case you are still encountering the “server DNS address could not be found” issue, then restart DNS Client service in Windows Services can help to fix it.
- To restart DNS Client service, press Windows + R, type: services.msc into the field and press Enter.
- In the Windows Services application, locate DNS Client, right-click on it and select “Restart“.
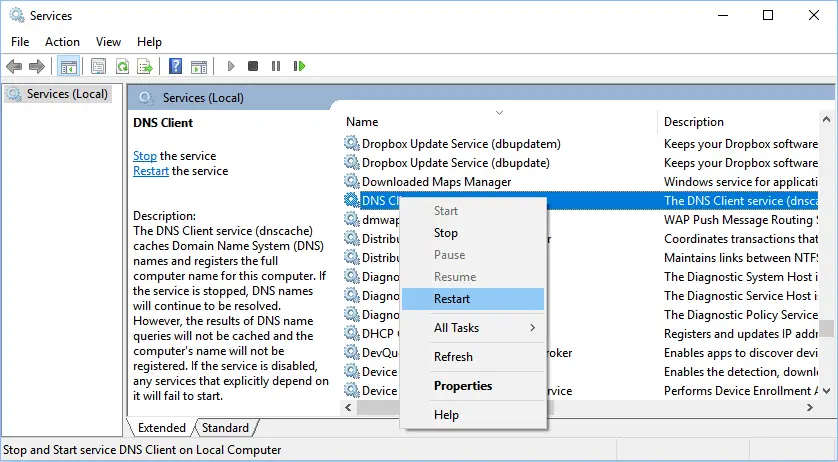
- After that, restart your Windows PC.