Disclaimer: This post may contain affiliate links, meaning we get a small commission if you make a purchase through our links, at no cost to you. For more information, please visit our Disclaimer Page.
Have you ever encountered DNS Lookup Failed error in Google Chrome? Do you know what this error is and how to fix it?
Nowadays, Microsoft’s Windows is a popular operating system that has installed and running on billion computers and devices.
However, it also has a few annoying errors that always repeat over and over and over again, such as DNS or BSOD errors. In Google Chrome, the DNS Lookup Failed is one of the most common errors, along with Err_Connection_Reset or Err_Name_Not_Resolved.
This error occurs because something happened to your DNS servers, such as DNS servers were timed out, or could not connect to DNS servers somehow.
Sometimes, this error occurs because your computer uses wrong DNS information. Also, expired caches could also cause DNS Lookup Failed error on your Google Chrome browser.
When it happens, you can’t use your Chrome browser to load any websites. It is a very annoying error, right?
However, this error is very easy to fix with a few simple steps. In this article, I will show you a few simple solutions you can follow and resolve DNS Lookup Failed error on your Google Chrome browser.
Learn How To Fix DNS Lookup Failed Error
As I said above, if DNS servers are timed out, DNS Lookup Failed error could appear on your Chrome browser.
By default, Windows PC (or any other operating systems, such as Mac OS or Linux) will automatically be pulled DNS details directly from the ISP (Internet Service Provider) and use them as default DNS servers.
However, these DNS servers are not stable and always time out. When it is timed out, it could lead to DNS errors.
In order to fix it, you just need to replace the default DNS server on your computer with a third-party DNS service, like Google’s DNS or OpenDNS. Both are excellent alternative DNS server services that recommended by many regular users and experts.
How To Change Default DNS Server On Your Computer
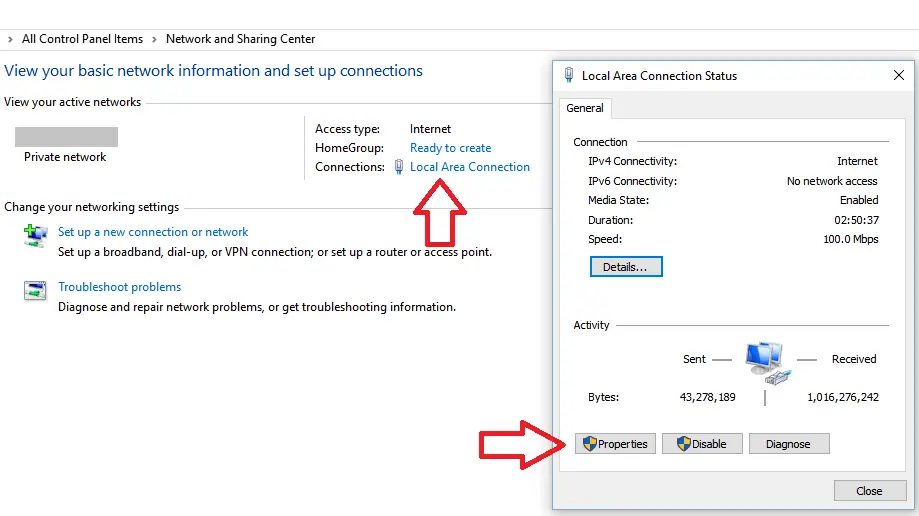
In order to change the default DNS server on your Windows computer, open Network and Sharing Center by right-clicking “Network icon” in the taskbar notification area, and then click “Open Network and Sharing Center”.
Next, click on the currently connected network adapter and select Properties.
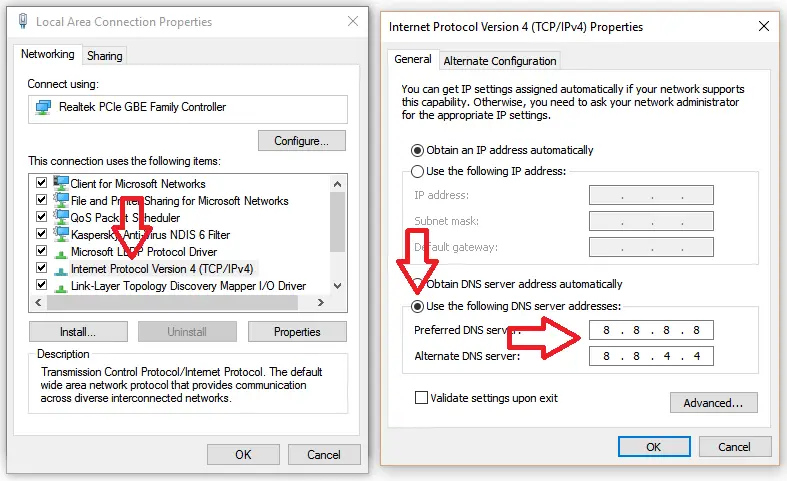
In the next step, click on the “Internet Protocol Version 4 (TCP/IPv4”. It will show you two boxes to enter DNS servers you want to use. Take a look at the image below.
I often use Google’s DNS service with the following IP addresses: 8.8.8.8 and 8.8.4.4. Just fill up two boxes with these IP addresses and the error should be fixed immediately.
This method can also help you to fix many other DNS errors on your Windows computer, including Dns_Probe_Finished_Nxdomain and Dns_Probe_Finished_Bad_Config.
If you are facing any DNS errors, you should also try this solution.
Clear DNS Cache On Your Computer To Fix DNS Lookup Failed Error
If you have tried the method above, but the error persists, you can try to remove all DNS caches on your Windows PC with a simple command in Command Prompt.
As I mentioned above, wrong DNS information or expired DNS caches could be a cause of this DNS error. So if you want to fix it, just flush all DNS caches on your Windows computer.
In order to remove all DNS caches:
- Click on Start logo.
- Type cmd.exe in the Run dialog box.
- Right-click on the cmd.exe.
- Choose “Run as Administrator” to open Command Prompt program with administrator privilege.
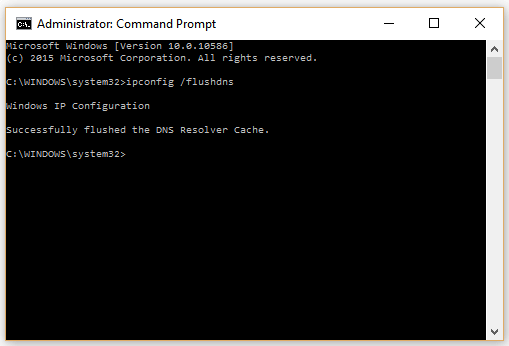
- In Command Prompt program, type ipconfig /flushdns and press Enter.
That’s it!
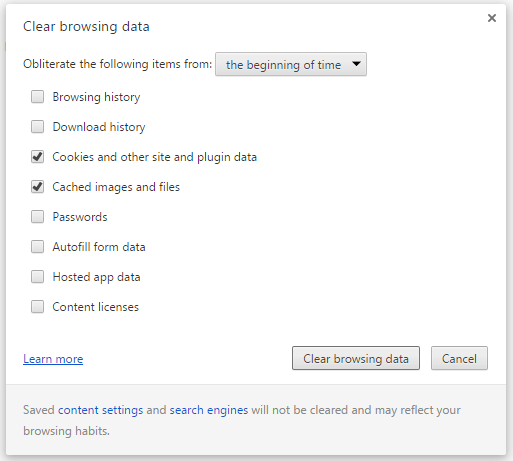
To increase the successful percentage of this solution, you should also remove all caches and cookies of your Google Chrome browser. If you don’t know how to do that, read this article.
I hope you have fixed DNS Lookup Failed error on your Chrome browser with these methods. These solutions also help you to understand more about DNS errors and resolve other DNS problems.


